Skype recorder : video & audio

Last update : November 16, 2013
The following tools are available to capture video and audio from skype calls :

  • VodBurner : 99,95 $ ; 14 day trial; record, edit, upload
  • Supertintin : 29,95 $ ; trial with 5 minutes recording limit; group video conference up to 10 ways
  • IMcapture (formerly SkypeCap) : 49,95 $ ; trial with 2 minutes recording limit and logo
  • eCamm (for Mac) : 19,95 $ ; free demo
  • PowerGramo : 14,95 $ (basic) up to 44,95 $ (enterprise); free trial; upgrades possible
  • Pamela : 14,95 $ (basic) up to 29,95 $ (business); 30 day trial; up to 15 minutes recording fro free ; cheap versions audio only
  • Replay Telecorder : 29,95 $ ; demo version; capture suit with 9 products in bundle for 59 $
  • Evaer : 19,95 $ ; free version with 5 minutes recording limit available ; licence pack for 5 users for 79,95 $ ; group video calls
  • AthTek Skype Recorder : (only audio) 19,95 $ ; free version with 5 minutes recording limit available; Lite version for 9,95 $

Screen recorders to capture video, sound and pictures of anything you see on your screen can also been used to record Skype video calls, but this is very CPU intensive.

I use the registered version of Evaer to capture skype video calls and to save them as mp4 videos in side by side format. The current Evaer version is 1.3.11.22, released on November 12, 2013.

If one of the Skype callers use an iPad or similar device, it’s best to set the tablet in landscape mode with the Home Button turned left, to assure that the user is displayed as expected in the video.

HTML CSS Box Model

last update: November 23, 2014

HTML CSS Box Model

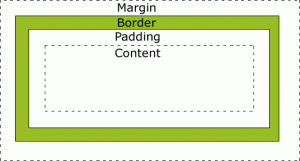
All HTML elements can be considered as boxes. The CSS Box Model is shown in the figure at left.

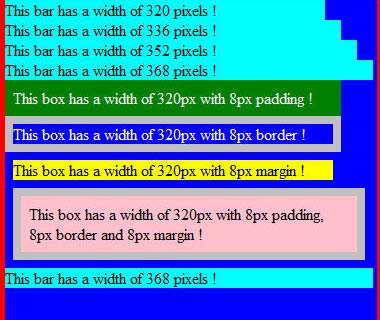
The width and height properties specified for an element with CSS refers only to the content area. To get the full size of the element, you must also add the padding, the border and the margin.
The different parts are :

Firefox

Padding, border and margin are added to the lengths

  • Margin : transparent area around the border
  • Border : a border around the padding and content with a border color
  • Padding : clears an area around the content with the background color of the box
  • Content : where text and images appear

Padding is the inner space of an element, whereas margin is the outer space of an element. Border is in the middle. The following figures shows the three properties for different browsers :

Firefox - IE9 - Chrome - Safari

Firefox-33 * IE-9 * Chrome-39 * Safari-5.1

In CSS, it is possible to specify different margins for different sides :

margin-top:25px;
margin-right:50px;
margin-bottom:75px;
margin-left:100px;

These margins can also be declared as a shorthand property :

margin:25px 50px 75px 100px;

The values are set clockwise, starting for the top. The same is true for padding. The CSS border properties allow you to specify the style, width and color of an element’s border. The border-style values are :

  • none
  • solid
  • dashed
  • double
  • groove
  • ridge
  • outset

None of the other border properties will have any effect unless the border-style property is set! The border width can be specified in pixels (px) or with the three pre-defined values: thin, medium, or thick.

The shorthand code to set the border is :

border:5px solid red;

The order of the values are : border-width, border-style, border-color.

The following list provides links to websites with additional informations about the CSS Box Model and related topics :

Advanced stuff about CSS selectors

Last update : June 24, 2014

CSS selectors are made up of a pattern that is matched against all elements in the document tree, it’s the part that comes before the opening curly brace. The selector types are :

  • Universal : *  (Matches any element)
  • Type :  p  (Matches  element p)
  • Class :  .info (Matches any element whose class attribute contains the value info)
  • ID : #temp (Matches any element with an id equal to temp)
  • Descendant : p b (Matches any b element that is a descendant of an p element)
  • Child : p > b (Matches any b element that is a child of an p element)
  • Adjacent : p + b (Matches any b element immediately preceded by a sibling element p)
  • Attribute : p[att condition] (Matches any p element whose att attribute is compliant to the condition)
  • Pseudo-Class : p:action (Matches p during certain  actions; pseudo-classes are first-child, link, visited, active, hover, focus, lang(cc))
  • Pseudo-Element : p:content (Matches p for certain contents; pseudo-elements are first-line, first-letter, before, after)

CSS Selectors can be grouped and combined :

  • Multiple class selectors :p.info.error {color:#900;font-weight:bold;}(Matches p elements which have both “info” and “error” in their list of class names)
  • Descendant selectors :div#temp li p.info { color:#f00; }(Matches all p elements with a class name of “info” that are contained by an li element that is contained by a div element with the id “temp”)
  • Child selectors :p > strong { color:red }(Matches all strong elements that are children of a p element)
  • Adjacent siblings selectors :p + p { color:green }(Matches an element p which is the next sibling p to the first element)
  • Grouping :#my1, #my2,  #my3 {color:blue}(Matches all elements with the id’s my1, my2 and my3)
  • Attributes selectors :p[lang|=en] { color:yellow }(Matches all elements whose lang attribute starts with “en”)

:before and :after

The :before and :after pseudo-elements can be used to insert generated content before or after an element’s content.

3 digit color hex codes:

The 3 digit only hex codes are shorthand for the codes that have the numbers repeated in pairs.

#06C = #0066CC

z-index:

The z-index property specifies the stack order of an element. An element with greater stack order is always in front of an element with a lower stack order. z-index only works on positioned elements (position:absolute, position:relative, or position:fixed). An element with a negative value is displayed behind any with an undefined or positive z-index value in the same stacking context.

Some useful links about CSS are :

Internet Explorer Conditional Comments

last update : 17 Januray 2012

Many web designers use browser detection techniques to ensure that their sites display properly when viewed with specific browsers. Often Internet Explorer prior to version 9 is focused by developers because of bugs or lack of support of new css features. The most common way to detect Internet Explorer is to use client-side scripting to parse the user-agent string and extract the version number from the version token. If one is specifically interested in Internet Explorer, conditional comments might be a more effective alternative.

Conditional comments are a simple Internet-Explorer-only feature that Microsoft added to IE5 Windows and later. They provide an easy way to detect what IE browser a visitor is using to serve him different blocks of HTML.

There are two types of conditional comment: downlevel-hidden and downlevel-revealed. Downlevel-hidden comments hide HTML from non-IE browsers and from down-level IE browsers. The basic syntax of a downlevel-hidden conditional comment is :

<!--[if expression]> HTML <![endif]-->

expression can contain a number of different operators and values.

The downlevel-revealed conditional comment enables you to include content in browsers that do not recognize conditional comments. The basic syntax is :

<![if expression]> HTML <![endif]>

Conditional comments are usually used to load specific css or javascript files.

Conditional comments produce valid W3C code.

More informations about these topics :

MotionPortrait

MotionPortrait Inc is an japanese entertainment solution company that creates “Surprise and Impression” pursuing technology and creativity.

You can apply MotionPortrait as web sales promotion tools in various business scenes with its realistic expression, easy operation and low installation cost.  MotionPortrait provides its technology for various platforms such as mobile phones, the web and game consoles.

The most exciting applications for mobile phones (iOS, Android, …) are :

  • PhotoSpeak : 3D Talking Photo
  • 3D Animalizer : transforms you and your friends into 3D animals
  • uMovie : movies starring YOU
  • MillionFace : takes a single portrait photo and transforms it into over a million face variations in a 3D interactive movie

Viewports for mobile devices and tablet PC’s : a pixel is not a pixel

Last update : June 24, 2014

Designing a webpage which looks good on desktop PC’s, mobile devices and tablet PC’s is challenging. You have to optimize your content at least for screens that are 320px, 480px, 768px, and 1024px wide. One tool to reach this goal is the viewport meta tag.

The viewport meta tag was introduced by Apple for the iPhone, and it has since been picked up by Microsoft for Windows Mobile, by Nokia for Maemo and by Android. Remember however that the viewport has nothing to do with the device. The viewport is the browser and more precisely the window of the browser. Recently the W3C published a draft of a CSS Device Adaptation based on the viewport meta tag.

The tag is ignored by regular desktop browsers.

<meta name="viewport" content="width=800" />

Mobile Safari presents desktop-sized websites on small screens by rendering to a virtual browser screen that is 980 pixels wide. Opera assumes a page to be 850 pixels wide. Pages on the iPad in portrait mode and on other mobile devices are scaled down.  Pages can be zoomed and panned. Viewport tags tell the Mobile Safari that the website displays properly narrower than 980 pixels. The webpage can be set for other scaling preferences.

Apple suggests to avoid hard-coding a width for the viewport and to use the physical device-width to set the viewport :

<meta name="viewport" content="width=device-width" />

This setting makes one CSS pixel equal to one device pixel. The physical device-width refers to the screen size in portrait mode. One problem is that the content is blowed up if the device is oriented in landscape mode. To avoid blow-up, a maximum scale factor can be applied :

<meta name="viewport" content="width=device-width, maximum-scale=1.0" />

You can add the attribute “user-scalable=no” to disable the pinch-to-zoom feature :

<meta name="viewport" content="width=device-width, user-scalable=no" />

This is useful for preventing accidental zooms and makes web apps feel more app-like, but most users might want to see the content at a larger size.

The complete list of viewport properties for iPad (and iPhone with Retina display) is given below :

  • width : 200 – 10.000 ; default : 980
  • height : 223 – 10.000
  • minimum-scale : 0.0 – 10.0 ; default : 0.25
  • maximum scale : 0.0 – 10.0 ; default : 1.6
  • initial-scale : between min and max
  • user-scalable : yes / no ; default : yes

To hide the control-bar which consumes about 60 pixels, the following script can be used :

<body onload="setTimeout(function() { window.scrollTo(0, 1) }, 100);"></body>

To deal with the greatly differing screen sizes, CSS media queries allow to specify completely different stylesheets depending on how large the screen is.

<link media="only screen and (max-device-width: 480px)" href="small.css" type= "text/css" rel="stylesheet">
<link media="only screen and (min-device-width: 481px) and (max-device-width: 1024px)" href="medium.css" type="text/css" rel="stylesheet">
<link media="screen and (min-device-width: 1025px)" href="large.css" type="text/css" rel="stylesheet">

Instead of using separate css-files, the media query can be used inside a single css-file :

@media only screen and (min-device-width: 481px) and (max-device-width: 1024px)
{
styles
}

In fact it’s useful to consider two viewports : one based on device pixels, the other based on CSS pixels. Only at zoom level 100% one CSS pixel is exactly equal to one device pixel.

The iPhone 4’s Retina display has a far larger physical pixel density than previous iPhones. Still, it reports 320px for the device-width media query (as well as JavaScript screen.width) both with and without the meta viewport width=device-width.

A few links about useful tutorials about viewports and other related subjects are listed herafter :

The next list shows links to iPad and iPhone simulators to test the rendering of webpages on these devices :

Facebook URL Linter and Insights

The Facebook URL linter is a tool that helps you to debug Open Graph webpages, pages with embedded like button or with other social plugins.

The Open Graph Protocol Open Source Community developped other tools and parsers for php, java, python, ruby, json to check Open Graph webpages.

It’s even possible to see how many URL’s of pages that are not part of the Facebook Open Graph have been shared by using the API request :

http://graph.facebook.com/?id=http://www.example.com

More details are provided by the API request

https://api.facebook.com/method/fql.query?query=SELECT%20share_count,%20like_count,%20comment_count,%20total_count,%20click_count%20
FROM%20link_stat%20WHERE%20url=%27http://www.example.com/%27

Insights provides analytics on a Facebook Page, app and website. The Insights Dashboard makes it easy to see how Facebook users are interacting with your content, and the Insights APIs allow developers to obtain additional statistics and integrate the data with third party reporting systems.

Valid W3C websites with Facebook Open Graphs or Like Buttons

last update : December 23, 2011
A developer who added Facebook Open Graph metatags or Like Buttons to his webpage finds a lot of error messages (invalid HTML/XHTML) in the W3C Validator. This means it won’t work on a lot of browsers.

Several fixes exist to make the webpages W3C compliant. A few useful links will be given below: