Mobile DICOM viewers

Last update : October 20, 2016

Note : the new versions released since spring 2016 have not yet been tested. It will be done in the coming days.

Introduction

This contribution refers to my recent updated post about DICOM image viewers. Mobile DICOM viewers are becoming more and more popular. They are very useful in the context of medical applications in the cloud.

Most web viewers can be used on mobile equipments (tablets, smart phones, …), but the focus of this post are native applications designed for Apple iOS or Android devices. DICOM Web viewers are handled in a separate contribution. In the present list I considered only those applications that have been updated after January 2014, with some exceptions.

Test Scenario

To test the selected apps, I used Orthanc (Windows versions 0.9.5 and 0.9.6) as PACS server. To have realistic DICOM samples,  I uploaded some DICOM studies from me and from family members relative to exams done in the past in hospitals in Luxembourg and France.

To set up a communication between a DICOM viewer and the Orthanc server, the viewer should allow to define the following parameters in the settings :

  • Remote AET
  • Remote Hostname/IP
  • Remote port number
  • Local AET
  • Local port number
  • Protocol : C-MOVE

The local IP is the address of the used mobile device.

If no settings are available for the port numbers, the port number of the server can be added to the remote IP address. The standard port number 104 can be tried as a first guess for the settings of the viewer. If no local AET settings are provided, the iPad name can be tried as a first guess. Another possibility is to use a DICOM network analyser like DVTk to detect unknown parameters. If the C-MOVE protocol is not supported by the viewer, the WADO or C-GET protocols can be an alternative.

In the presentation of the selected mobile viewers, I generally used the terminology published by the developers, even if I disagree with their claims.  In the case of apps that worked as expected with the Orthanc server, I added some screenshots to show the look-and-feeling of the viewer.

Purpose of the evaluation

You may ask what is the purpose to evaluate proprietary closed source applications in an open source environment. I started the evaluation in mid-2015 in the context of the development of an educational tool for radiologists, called RadioLogic. The reasons were various :

  • to familiarize with the DICOM technologies (learning by doing)
  • to compare the performance of native apps with HTML5 web apps on tablets and phones
  • to explore the different types of graphical user interfaces to create a best-of-breed GUI for the RadioLogic project
  • to examine the assets of viewers certified / cleared by FDA or CE
  • to test features that are not (yet) available on HTML5 web apps

iOS Applications

DICOM

Mobile DICOM viewers (icons) arranged in a folder on the iPad Desktop

The following DICOM viewer apps, which are currently available at the AppStore, have been tested. They are arranged and listed in alphabetical order :

1. aycan mobile

aycan mobile is an iPad app which allows to receive and display DICOM images in an easy, secure and fast way. Developed by aycan Digitalsysteme GmbH, the current version 1.08.000 was updated on July 22, 2015. The viewer works only with the aycon DICOM workstation, which is based on Osirix. A demo server with ID and password “aycan” allows to explore some demo studies. A subscription is required to use all features of the the ayMobile communication service. A free 30-days-trial subscription can be ordered on the aycan website.

2. DICOM-AVC

DICOM-AVC is available for iPad and iPhone. The current free version is 2.2 has not been updated since July 12, 2012. It has been developed by the The New Medical Product Server LLC who claims that DICOM-AVC is a complete real-time collaborative imaging and videoconferencing tool which was once the number one downloaded app on the AppStore. To use the app, registration of an account is required, which can be upgraded to a premium account for 19.99$ per year. Today it’s displayed as black screen on my iPad.

3. DICOM Mobile

Dicom Mobile is a simple but powerful DICOM viewer for iPhone and iPad, developed by Luigi Orso. The current version is 1.4.0, updated on June 3, 2015. The price is 2.99$, with additional in-app purchases for extensions. The developer provides support on his website. DICOM files can be loaded from a DropBox account or from a Web server, but not from a PACS server.

DICOM Mobile Menu

DICOM Mobile Main Menu

DICOM Mobile Dropbox Panel

DICOM Mobile Dropbox Panel

4. DICOM Viewer HD

The free version 1.0 of DICOM Viewer HD was released on July 4, 2014, by Wingspan Xi’an Electronic Technology Co., Ltd from China. I was not able to evaluate the app, the login or registration in the “User Manageer” always fails.

5. DICOM IR

DICOM IR is one of the easiest and most intuitive 2D DICOM Image viewers for iOS. DICOM IR can browse any standard PACS server. DICOM IR is developed by Pietro Zuco, a freelance mobile developer based in London/Tokyo/Barcelona. Pietro Zuco has a solid experience developing 2D games, utilities, educational and entertainment applications on iOS and OSX systems. Version 1.0 of DICOM IR was released on July 25, 2015 and is free for a limited time. The app supports C-ECHO, C-FIND and C-MOVE queries.

DICOM IR has a very clean GUI, an excellent user guide, a perfect configuration panel, a performant viewer and it works as expected with the Orthanc server. My compliments to this author.

DICOM IR PACS Server Configuration Panel

DICOM IR PACS Server Configuration Panel

DICOM IR User Guide

DICOM IR User Guide

DICOM IR search panel

DICOM IR search panel

DICOM IR Metadata Info panel

DICOM IR Metadata Info panel

DICOM IR image viewer panel

DICOM IR image viewer panel with line tool

6. iDO Viewer

The iDO medical image viewer is quickly becoming the next generation in mobile medical image viewing by combining multi-modality imaging with individualized physician workflow. Developed by EBM Technologies, Incorporated, the current version 1.1.4 was updated on March 30, 2016. This application requires the EBM iDO server, demo servers to view sample data and basic features of the app are available and can be selected in the settings panel.

7. imageFlow.mobile

imageFLOW.mobile is the best-in-class mobile application for medical imaging PACS users on iOS devices. imageFLOW is developed by imagitive GmbH. The current free version 2.0, based on Imagitive’s DaVinci framework, was updated on November 25, 2015. A DemoServer mode to explore some DICOM studies is enabled by default. A PACS server can be configured in the general iOS settings, nevertheless access trials failed with a “Server Authentication” error message.

8. iMango

iMango is the iOS adaptation of the famous Mango DICOM viewer developed at the Research Imaging Institute (RII), an Organized Research Unit (ORU) of the University of Texas Health Science Center at San Antonio. It works on iPad’s. The current version 1.3 was updated on June 10, 2015. The price is 14.99$. A PACS server can be configured in the general settings and the app works as expected with the Orthanc server. iMango also supports the WADO protocol.

iMango Transfer Options Panel

iMango Transfer Options Panel

iMango Server Configuration Panel

iMango Server Configuration Panel

iMango User Guide

iMango User Guide

iMango image viewer with about panel

iMango image viewer with about panel

iMango image viewer with metadata info panel

iMango image viewer with metadata info panel

iMango image tools

iMango image tools

9. iPaxera

iPaxera is one of the fastest and easy to use PACS viewing applications specifically designed for viewing and navigating studies with your iPad, iPhone, and iPod. iPaxera is developed by Paxeramed Corp, a world leading medical imaging solution developer based in Boston, that develops a full range of medical imaging solutions. The current free version 3.10 was updated on May 4, 2016. A PACS server can be configured in the “Add Node” panel. Ipaxera works as expected with the Orthanc server. The app also supports the WADO protocol.

Onn Akbar Ali reported that Ipaxera can display multiframe Jpeg images ( such as angiography ) quite well.

iPaxera login panel

iPaxera login panel

iPaxera PACS server configuration panel

iPaxera PACS server configuration panel

iPaxera search panel

iPaxera search panel

iPaxera worklist panel

iPaxera worklist panel

iPaxera image viewer with measure tool and series list panel

iPaxera image viewer with measure tool and series list panel

10. iTA View

iTA VIEW is a viewer for DICOM and DICOM RT objects developed for iPad and dedicated to radiotherapy. The app is developed by Tecnologie Avanzate TA srl in Italy. The current version 1.2.0 was updated on March 8, 2016. The app works with the Orthanc server. To transfer studies without limitations, an upgrade to the full version is required. The price for the upgrade is 29.99 EUR.

ITA View PACS server configuration panel

ITA View PACS server configuration panel

ITA View User Guide

ITA View User Guide

ITA View worklist panel

ITA View worklist panel

ITA View database panel

ITA View database panel

ITA View image viewer

ITA View image viewer

11. Jack Imaging Medical Image Viewer

Jack Imaging Medical Image Viewer is a medical image viewer for the iPad that makes use of nephosity’s patent pending technology, the latest in medical imaging innovation. It supports reading the DICOM format and the most common imaging modalities. The viewer is developed by Nephosity Inc. The current version 3.0.5 was updated on January 25, 2016. The prize is 0.99$. The viewer works only with the Jack Imaging platform which  stores the DICOM data in the cloud. Currently Amazon’s cloud infrastructure is used to provide the best performance and highest security levels. During a beta phase the Jack Imaging platform accounts are offered for free. On 4th generation iPads the Jack Imaging viewer offers FDA cleared capabilities.

11. Keiron

Keiron is an innovative App that allows you to view, annotate and analyse radiographic images stored in the DICOM standard. The current free version 1.0 was released on May 4, 2015. Keiron is developed by Digital Video S.p.A., the creator of Toonz. A PACS server can be configured in the settings, but only the ECHO and C-FIND queries are working with the Orthanc server. The “download” button to load DICOM instances is disabled.

Keiron serevr & client configuration

Keiron server & client configuration panels

Keiron viewer settings

Keiron viewer settings panel

Keiron worklist panel

Keiron worklist panel

12. LEADTOOLS MedicalWebViewer

The LEADTOOLS Medical Web Viewer is a zero footprint solution available for iPad and iPhone, developed by Leadtools Technologies Inc. The current free version 3.0 was updated on May 27, 2016. The viewer works only with LEAD’s web servers so you can quickly access the features of the LEADTOOLS Medical Web Viewer Framework SDK with the default settings.

13. loDicom Viewer

loDicom Viewer allows you to view, archive and transfer 2D medical images in DICOM format. Developed by Luigi Orso, the current version 4.1.1 was last updated on July 30, 2014. The price is 12.99$. The developer is also the author of the DICOM Mobile viewer. He provides support on his website, which is not useless, because the app crashes systematically on my iPad. ECHO tests with the Orthanc server are succesful, but a C-FIND query leads to a crash. I was only able lo load DICOM files via a DropBox. The GUI is not very intuitive, the user guide is not very helpful.

loDICOM viewer PACS server configuration

loDICOM Viewer PACS server configuration panel

loDICOM Viewer

loDICOM Viewer ECHO Test panel

loDICOM Viewer image panel

loDICOM Viewer image panel

loDICOM Viewer user guide

loDICOM Viewer user guide

14. MedFilm

MedFilm is a fast dicom viewer developed by Fuli Wu, a researcher at the Zhejiang University of Technology in Hangzhou, China. The app is available for iPad and iPhone. The current free version 4.25 was updated on June 1, 2016. A PACS server can be configured with support of the WADO protocol. The C-MOVE protocol is not supported.

MedFilm

MedFilm DICOM file and image panels

15. Med View

Med View is developed by Matthias Rudolph and available for iPad and iPhone. The current free version 1.1 was updated on October 23, 2015. DICOM files can be loaded from the iTunes file sharing service or from FTP servers.

16. Mobile MIM

The Mobile MIM software program is used for the viewing, registration, fusion, and/or display for diagnosis of medical images from various modalities. Developed by MIM Software Inc., the current version 4.0 was updated on July 26, 2016. Image data can only be transferred to the device by using MIMcloud or MIM 5.1+ workstation software.

17. mRay

mRay, developped by mbits, is available for iPad and iPhone. The current free version 4.1.6 was updated on October 4, 2016. mRay is a CE certified and approved medical product. To be able to receive images in mRay from your PACS, the mRay Server Software must be installed, which can be used free of charge for an evaluation period.

18. MyXray

MyXray is an easy and intuitive app that will let you see your x-ray files as a real doctor. The free version 1.0 was released on September 8, 2015. The app is developed by Pietro Zuco, the author of the outstanding DICOM IR app. MyXray is a lite version of DICOM IR without support of DICOM communications.

19. Nuance PowerShare

Nuance PowerShare Mobile gives you instant access to your medical images and reports stored on the Nuance PowerShare Network using your iOS device. The free version 5.5.10 was updated on August 16, 2016. I was not able to load this app from the AppStore.

20. OsiriX HD

OsiriX HD is the iOS adaptation of the famous OsiriX DICOM viewer, running on Mac OSX,  which is considered as a reference for DICOM image viewers. It works on iPhone’s and iPad’s. The current version 4.2 was updated on October 14, 2016. The price is 49,99$, with additional inline sales. Osirix HD can be configured in the general settings. The app works as expected with the Orthanc server and supports also the WADO protocol.

Osirix HD PACS Server configuration panel

Osirix HD PACS Server configuration panel

Osirix HD Exams Panel

Osirix HD Exams Panel

osirixhd_split_screen

Osirix HD Split Screen in image viewer

Osirix HD Image viewer

Osirix HD Image viewer with stack of 20 instances

osirixhd_metadata

Osirix HD Metadata Panel

21. PACS DICOM Viewer

PACS DICOM Viewer app is a free, vendor-neutral PACS browser and DICOM viewer which works on iPad. It is developed by Logicpond Inc, a California based product design and development solutions company. The current version 2.1.1 was updated on November 11, 2015. The viewer can be configured to work with the Orthanc server, but the C-MOVE queries are aborted during the image transfer. The WADO protocol  is also supported  and works with Orthanc.

PACSDICOM Viewer startup picture

PACSDICOM Viewer startup picture

PACSDICOM Viewer configuration panel

PACSDICOM Viewer configuration panel

PACSDICOM Viewer search panel

PACSDICOM Viewer search panel

PACSDICOM Viewer worklist

PACSDICOM Viewer worklist panel

PACSDICOM Viewer download success

PACSDICOM Viewer download success

PACSDICOM Viewer images with rainbow LUT

PACSDICOM Viewer images with rainbow LUT

PACSDICOM Viewer metadata panel

PACSDICOM Viewer metadata panel

22. R-Site Mobile

R-Site Mobile for IOS supports 2D, 3D and MIP/MPR operations for DICOM files. To use this app, you have to own at least one set of R-Site PACS. R-Site is developed by DJ HealthUnion Systems Corporation in China. The current version 1.0.2.47 was updated on August 31, 2016.

23. ResolutionMD

ResolutionMD enables doctors to securely view patient images and reports from a wide variety of computers and mobile devices, collaborate with other practitioners and diagnose from any location. The product requires access to a configured ResolutionMD Server. It contains a demo mode to allow to experience the full functionality of ResolutionMD on a variety of anonymous patient images. ResolutionMD is devloped by Calgary Scientific Inc. The free version 5.3.3. was updated on July 19, 2016.

Android Versions

DICOM Android apps on Samsung Galaxy Tablet 2 - 7.0

DICOM Android apps on Samsung Galaxy Tablet 2 – 7.0

The following iPad applications are also available as Android version on Google Play Store (in alphabetical order) :

3a. DICOM Mobile

The current Android version 1.3.2 of DICOM Mobile was updated on August 13, 2014. The price is the same as for the iOS version : 2.99$. The GUI and the features of the viewer are also identical to the iOS version. DICOM images can only be loaded from DropBox or from other web servers.

Android DICOM Mobile menu panel

Android DICOM Mobile menu panel

9a. iPaxera

The Android free version 2.0.1 of  iPaxera was updated on September 15, 2016. This app requires Android 4.4 or greater and I was not able to test it on my Samsung Galaxy tablet running Android 4.2.2. A few days later I changed my Blackberry phone with an LG Spirit phone running Android 5.0.1. After installing iPaxera on this phone, I noticed that the Android version is different from the iOS version and allows no PACS server configuration, but only dowloads of DICOM files from Dropbox or iTune sharing.

10a. iTA View

The Android free, but limited, version 1.10 of iTA View was updated on October 27, 2014. An in-app upgrade priced 26.99 EUR is available through the Google Play Store.

iTA

iTA View PACS server configuration panel

iTA

iTA View settings panel

iTA

iTA View search panel

12a. LEADTOOLS MedicalWebViewerDemo

The Android version of the LEADTOOLS MedicalWebViewer is the online live demo of the Medical Web Viewer Framework included with LEADTOOLS PACS Imaging and Medical Imaging Suite. The current version 1.4.1 was updated on February 2, 2014.

17a. mRay

The Android free version 4.1.6 of  mRay was updated on September 23, 2016. The mRay app can not be used without the installation of the mRay Server Software.

Android Applications

The following DICOM viewers are only available as Android version (in alphabetical order) :

24. Dicomite

Dicomite is a free and powerful DICOM viewer with intuitive and simple user interface, optimized for use on multi-touch devices. Dicomite is developed by Samsung MNO Lab. The current version 1.7.1 was updated on October 11, 2016. To display images they must be downloaded into the local memory with an Internet browser.

DICOMITE

DICOMITE image panel

25 Direct DICOM

The Direct DICOM Viewer is developed by Hui Zhang. The current version 1.2.4 was updated on March 21, 2015. To display images they must be downloaded into the local memory with an Internet browser. The app works however as DICOM server and local DICOM files can be stored to the Orthanc server.

Direct Dicom viewer image and metadata panels

Direct Dicom viewer image and metadata panels

Direct Dicom viewer server and store (push) panels

Direct Dicom viewer server and store (push) panels

26. Droid Dicom Viewer

The Droid Dicom Viewer was developed by Pierre Malarme. The free current version 3.2.3 was updated on May 17, 2011. Droid Dicom Viewer is a Free and Open Source Software (FOSS) licensed under the terms of the GNU General Public License. To display images they must be downloaded into the local memory (cache) with an Internet browser.

Droid DICOM viewer about panel

Droid DICOM viewer about panel

Droid DICOM viewer cache panel

Droid DICOM viewer cache panel

Droid DICOM image panel

Droid DICOM image panel

Droid DICOM viewer image panel with

Droid DICOM viewer image panel with LUT/CLUT

27. DroidRender

DroidRender is a 3D DICOM viewer for Android, including DICOM file support by GDCM,
volume rendering and tissue segmentation and display. Developed by Startm, the current version 3.2.0 was updated on August 26, 2016. The app proposes in-app purchases at prices between €1.04 – €104.08 per item and displays ads at the bottom of the screen. To display images they must be downloaded into the local memory (cache) with an Internet browser.

Droid Renderer

Droid Render image panel

28. Mobile Dicom

Mobile Dicom is a free Android Mobile Dicom (Diconde) Viewer application which is based on opensource OFFIS DCMTK as its backend library. Inspired by opensource community and in the hope of extending usage of the library on Android devices, the Mobile Dicom / Diconde tool was created by Feng Gao. The current version 2.4 was updated on November 23, 2015. To display images they must be downloaded into the local memory (cache) with an Internet browser. The app works however as DICOM server and can store local DICOM files tthe Orthanc server.

Mobile Dicom Viewer about and config panels

Mobile Dicom Viewer start and about panels

Mobile Dicom Viewer load and config panels

Mobile Dicom Viewer load and config panels; ECHO test was succesfull

Mobile Dicom Viewer image and metadata panels

Mobile Dicom Viewer image and metadata panels

29. simplyDICOM

Simply DICOM is currently in public beta. It should work with any uncompressed DICOM images, downloaded into the local memory. The viewer has a minimal interface to keep the focus on the images themselves. The developer is Christopher Boyd. The current version 0.7.3 was updated on May 27, 2015. To display images they must be downloaded into the local memory (cache) with an Internet browser.

Simply DICOM

SimplyDICOM image viewer

DICOM file downloads

If DICOM files are served with the extension .dcm or/and with the content type application/dicom, they are recognized as DICOM images in iOS Safari and can be opened directly in the following DICOM viewers : MedFilm, MyXray, Osirix HD, DICOM IR, iMango or Dicom Mobile.

Safari .dcm files

.dcm files recognized as DICOM images in iOS Safari browser by DICOM viewers

DICOM files embedded in .zip archives are recognized by the same DICOM viewers in the iOS Safari browser.

Safari .zip files

.zip files recognized in iOS Safari browser by DICOM viewers

On Android devices, DICOM files are only recognized by the DIRECT DICOM viewer in the Android browser, but they can be downloaded in the /storage/emulated/0/Download/ folder where they are accessible by most Android DICOM viewers.

Android DICOM file download panel

Android DICOM file download panel

Links

The following list provides links to mobile applications which are not DICOM viewers, but related to medical imaging (in alphabetical order) :

Conclusions

Among the 29 tested native mobile DICOM viewers, 18 are iOS apps, 6 are Android apps and 5 are available on the two platforms. 9 viewers can be configured to access a vendor-neutral PACS server, but only 5 of them work as expected and comply with the Orthanc PACS server. Among them are the three renowned commercial viewers iMango, iTA View and Osirix (priced between 15 and 50 USD), one free app (iPaxera) developed by a world leading medical imaging solution provider (Paxeramed Corp) and one app (DICOM IR) created by an independent free-lance developer ( Pietro Zuco). The other 4 configurable viewers are limited, partially disabled or crashing.

The remaining viewers are demo apps working with proprietary PACS systems, displaying only DICOM files loaded from DropBox or from another web server or crashing and working not at all. There are additional DICOM viewer apps in the AppStore and the Google PlayStore which are not listed because they were not updated in the last two years.

My two cents

I was shocked to see that most native mobile apps in the medical domain are not state of art. Apps in the stores which have not been updated in the last few years, text errors in the menus, program errors in the logic ( 2 viewers change the AETitle during communications), crippled GUI’s when the orientation of the device changes, wrong version numbers in the about panel etc, are testimonies of the poor quality.

DICOM Testing with DVTk

Last update : January 10, 2020

DVTk history

DVTk is an open source project for testing, validating and diagnosing communication protocols and scenarios in medical environments. It supports DICOM and IHE integration profiles. The project started in 1997 by Philips and was joined by Agfa in 2001. In 2005, DVTk was open sourced and one year later ICT Automatisering joined the open source community. In 2009 Agfa left the project.

The following tools are currently free available from the DVTK.org website or from GitHub :

  • DICOM Compare, v 5.0.0
  • DICOM Editor, v 5.0.2
  • DICOM Network Analyzer, v 5.0.1
  • DVT Validator, v 5.0.3
  • Query Retrieve SCP Emulator, v 5.0.1
  • RIS Emulator, v 5.0.0
  • Storage SCP Emulator, v 5.0.2
  • Storage SCU Emulator, v 5.0.1

DVTk Tests

I used these tools in the context of the development of an education tool for radiologists called RadioLogic. I edited the following script to execute an ECHO test and a STORE-SCP test with the Orthanc DICOM Server, version 0.9.5 :

# DVT Dicom Script
SESSION
SESSION-TYPE emulator
SESSION-FILE-VERSION 1
# Product Test Session Properties
SESSION-TITLE "Orthanc Server"
SESSION-ID 001
MANUFACTURER "Manufacturer"
MODEL-NAME "Product Name"
SOFTWARE-VERSIONS "Version 1.0"
APPLICATION-ENTITY-NAME "ORTHANC"
APPLICATION-ENTITY-VERSION "0.9.5"
TESTED-BY "Marco Barnig"
DATE "20151208"
# SUT ACSE Properties
SUT-ROLE acceptor
SUT-AE-TITLE "ORTHANC"
SUT-MAXIMUM-LENGTH-RECEIVED 16384
SUT-IMPLEMENTATION-CLASS-UID ""
SUT-IMPLEMENTATION-VERSION-NAME ""
# DVT ACSE Properties
DVT-AE-TITLE "DVTK_STR_SCU"
DVT-MAXIMUM-LENGTH-RECEIVED 16384
DVT-IMPLEMENTATION-CLASS-UID "1.2.826.0.1.3680043.2.1545.1"
DVT-IMPLEMENTATION-VERSION-NAME "DVT2.6"
# Socket Properties
SUT-HOSTNAME "localhost"
SUT-PORT 4242
DVT-PORT 104
DVT-SOCKET-TIMEOUT 30
USE-SECURE-SOCKETS false
TLS-VERSION "TLSv1"
CHECK-REMOTE-CERTIFICATE true
CIPHER-LIST "aRSA+kRSA+SHA1+eNULL:@STRENGTH:-SSLv2"
CACHE-TLS-SESSIONS true
TLS-CACHE-TIMEOUT 300
CREDENTIALS-FILENAME ""
CERTIFICATE-FILENAME ""
# Test Session Properties
LOG-ERROR true
LOG-WARNING true
LOG-INFO true
LOG-RELATION false
LOG-DEBUG false
LOG-DULP-STATE false
LOG-SCP-THREAD true
PDU-DUMP false
STORAGE-MODE as-media
STRICT-VALIDATION false
DETAILED-VALIDATION-RESULTS true
SUMMARY-VALIDATION-RESULTS true
INCLUDE-TYPE-3-NOTPRESENT-INRESULTS false
AUTO-TYPE-2-ATTRIBUTES true
DEFINE-SQ-LENGTH false
ADD-GROUP-LENGTH false
# Supported Transfer Syntaxes
SUPPORTED-TRANSFER-SYNTAX "1.2.840.10008.1.2"
SUPPORTED-TRANSFER-SYNTAX "1.2.840.10008.1.2.2"
SUPPORTED-TRANSFER-SYNTAX "1.2.840.10008.1.2.1"
# Configurable Delay between N-Action and N-Event Command
DELAY 10
# Definitions
DEFINITION-DIRECTORY "%COMMONPROGRAMFILES%\DVTk\Definition Files\DICOM\"
DEFINITION "All DIMSE Commands.def"
DEFINITION "CT Image Storage.def"
DEFINITION "Digital X-Ray Image Storage - For Presentation.def"
DEFINITION "Digital X-Ray Image Storage - For Processing.def"
DEFINITION "Enhanced CT Image Storage.def"
DEFINITION "Enhanced MR Image Storage.def"
DEFINITION "Media Storage Directory.def"
DEFINITION "MR Image Storage.def"
# Results
RESULTS-ROOT ".\results\"
APPEND-TO-RESULTS-FILE false
# DICOMScript Description Directory
DESCRIPTION-DIRECTORY ".\html\"
ENDSESSION

Scripts are saved as text files with the extension .ses. Several scripts can be referenced in an xml-project file with the extension .pdvt.

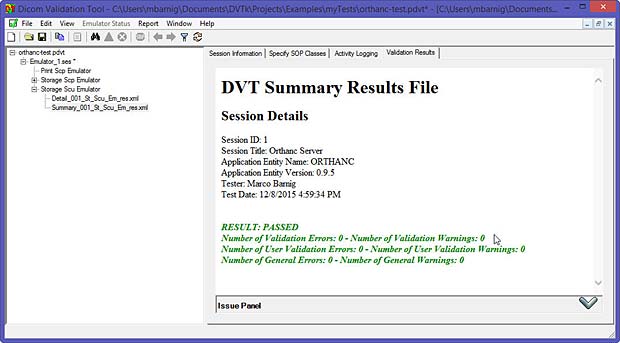
The following figure shows the resulting settings in the DVTk session panel :

Session

DTVk DICOM validator session panel

By double-clicking on the Storage-SCU-emulator link at the left, a window pops up allowing to do an ECHO test or to send a DICOM file to the Orthanc server. The exchanged messages are displayed in the Activity Logging panel :

DVT

DVTk Activity Logging

After the succesful sending of a DICOM file to the Orthanc server, a summary of the validation results is shown in the Validation Results panel :

DVT

DVTk Validation Results

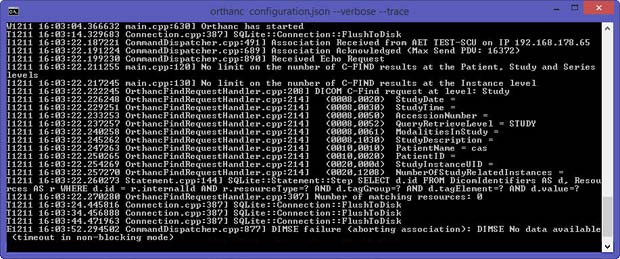
In verbose mode, the Orthanc Server provides the following releated messages in the command window :

Orthanc Server output in verbose mode

Orthanc Server output in verbose mode

DVTk Network Sniffer

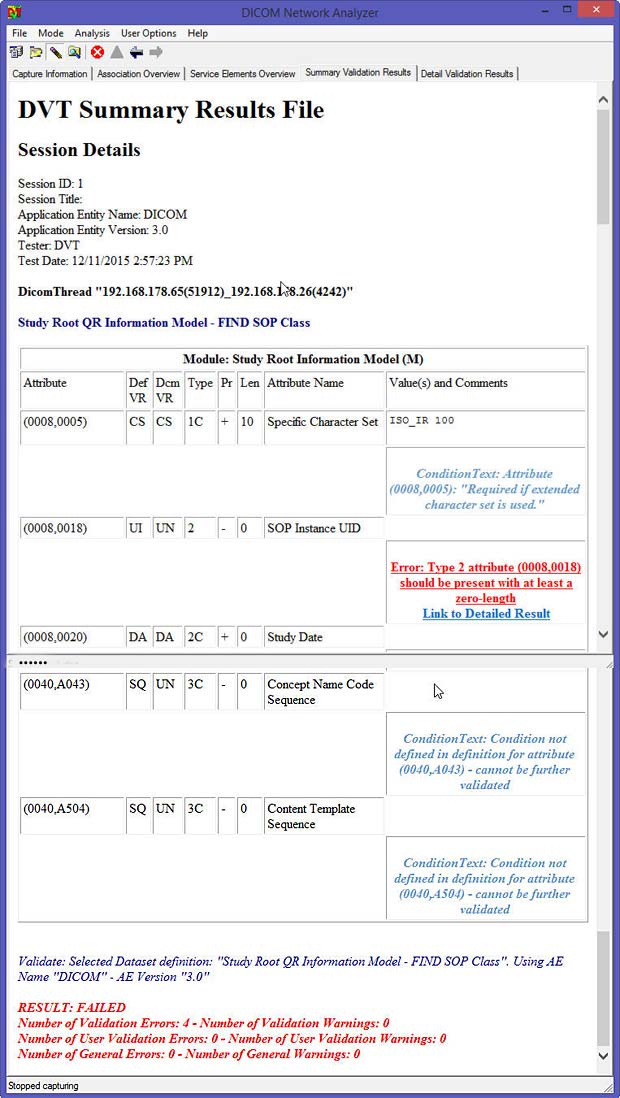
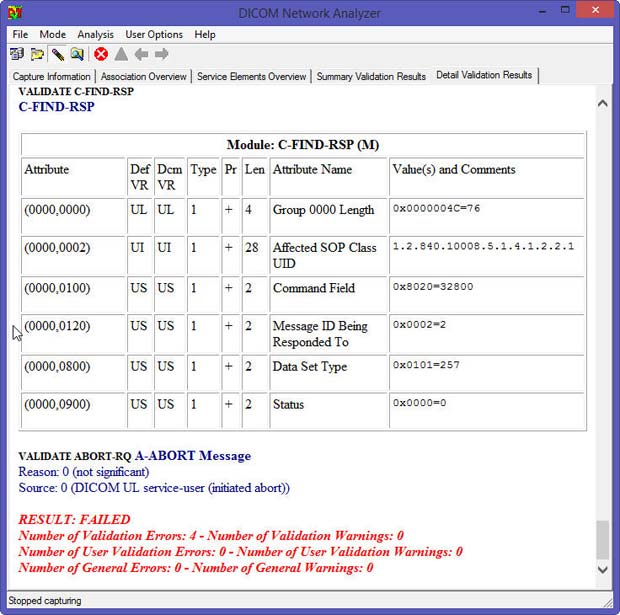
The next figure shows the results of the DVTk network sniffer analyzing the DICOM traffic between the OSIRIX HD viewer on iPad with the ORTHANC DICOM server (version 0.9.6) running on Window 8.1.

DVTk

DVTk summary results of FIND Request sent by Osirix HD from iPad

I entered only the first characters of the patient name to send a FIND query. DVTk reports four errors in the C-FIND communication because the following data elements are not valid :

  • (0008, 0018) : SOP Instance UID > should be present with at least a zero length
  • (0010, 0020) : Patient ID > should be present with at least one value
  • (0020, 000D) : Study Instance UID > should be present with at least one value
  • (0020, 000E) : Series Instance UID > should be present with at least one value

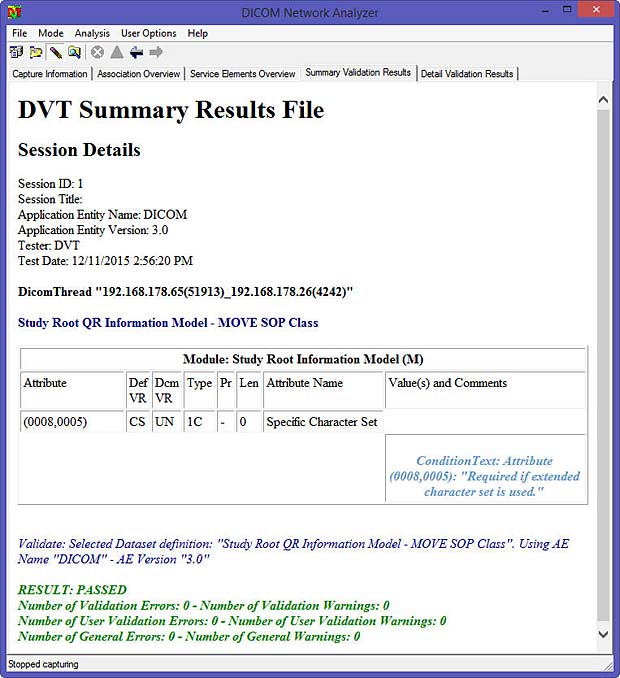
The C-MOVE communication works without errors and the received results displayed in Osirix HD are correct.

DVTk

DVTk reports no errors in the C-MOVE communication between Osirix HD and Orthanc

The Orthanc server shows no specific error message in the command window.

The OSIRIX HD viewer is configured as follows :

  • Remote AET : ORTHANC
  • IP : 192.168.178.26
  • Port : 4242
  • AETitle : OSIRIXHD
  • IP : 192.168.178.65
  • Port : 4096
  • Transfer Syntax : Implicit Little Endian (preferred syntax by Orthanc)
  • Encoding : ISO IR 100 (Latin-1)
  • Protocol : C-MOVE
  • Timeout : 90 sec

Communication Failure

The next example shows the case of a failed communication. The C-FIND query sent by the PACS DICOM iPad app to the Orthanc server (version 0.9.6) is aborted with a DIMSE failure. The query is identical to the C-FIND request sent by Osirix HD. The Orthanc log signals “DIMSE No data available (timeout in none-blocking mode)”.

PACS DICOM

Orthanc log messages related to a C-FIND command sent by the PACS DICOM app

The DVTk network analyzer shows the same four errors as in the case of the Osirix communication. After a timeout, the communication is aborted.

DVTk

DVTk signals an Abort Request in the PACS DICOM – Orthanc association

The PACS DICOM viewer is configured as follows :

  • Server AET : ORTHANC
  • Host Name/IP : 192.168.178.26
  • Server Port : 4242
  • Local AET : TEST-SCU
  • Device IP Address : 192.168.178.65
  • Local Port : 4096
  • Protocol : C-MOVE

A deeper analysis is required to identify the reason of the abort request. If the problem is caused by a non-valid parameter in the C-FIND query, the recently proposed LUA script filter will be an excellent remedy.

Accessing Local Virtual Hosts

Last update : September 7, 2015

Local Networks

A local area network (LAN) is a computer network that interconnects computers within a limited area such as a residence, school, laboratory, or office building. It is contrasted to a wide area network (WAN), which covers a larger geographic distance and may involve leased telecommunication circuits. Ethernet over twisted pair cabling and Wi-Fi (WLAN) are the two most common transmission technologies in use for local area networks.

Virtual Hosts

The term Virtual Host refers to the practice of running more than one website (such as dev.radiologic.fr and local.radiologic.fr) on a single machine. The fact that they are running on the same physical server is not apparent to the end user. Apache was one of the first servers to support virtual hosts right out of the box.

Computer Name, Address and Route

To find and access a computer in an network, we must know the following informations :

  1. Name : to indicate what we seek ( > Domain Name )
  2. Address : to indicate where it is ( > IP Address )
  3. Route : to indicate how to get there ( > Routing )

Domain Name

Domain names are used to identify one or more IP addresses. They are used in URLs to identify particular web pages. Domain names can be local or public. The latter must be registered with an ICANN accredited registrar.

A domain name consists of one or more parts, technically called labels, that are conventionally concatenated, and delimited by dots, such as example.com. The right-most label conveys the top-level domain (TLD), including the generic top-level domains (gTLDs), such as the prominent domains com, info, net, edu, and org, and the country code top-level domains (ccTLDs) such as lu, de, fr.

Below the top-level domains in the domain name hierarchy are the second-level domain (SLD) names. These are the names directly to the left of the top-level domains. Second-level domain names are usually created based on the name of a company, product or service. There can be additional sub-level domains with virtually no limitation. Below these levels, the most right domain name component is used to designate a particular host server, for example www for a world wide web server, ftp for an FTP server, or any other label. A domain name with TLD, SLD and hostname is called a fully qualified domain name (FQDN), for example dev.radiologic.fr.

Local domain names used in local networks can be freely chosen by the network administrator, but some TLD’s should be avoided. For example Apple uses the domain extension .local for it’s implementation of zero-configuration networking called Bonjour.

To map domain names to IP addresses, a Domain Name System (DNS) is used.

IP Address

An IP Address (Internet Protocol address) is a numerical label assigned to each device participating in a computer network that uses the Internet Protocol for communication. The designers of the Internet Protocol defined an IP address as a 32-bit number (IPv4) which is still in use today. A new version of IP (IPv6), using 128 bits for the address was developed in 1995 to avoid a depletion of the available addresses. Its deployment has been ongoing since the mid-2000s.

IP addresses are usually written and displayed in human-readable notations, such as 172.16.254.1 (IPv4), and 2001:db8:0:1234:0:567:8:1 (IPv6).

An IP address is logically recognized as consisting of two parts: the network prefix and the host identifier, or interface identifier (IPv6). The routing prefix is expressed in CIDR (Classless Inter-Domain Routing) notation. It is written as the first address of a network, followed by a slash character (/), and ending with the bit-length of the prefix. For example, 192.168.1.0/24 is the IPV4 prefix starting at the given address, having 24 bits allocated for the network prefix, and the remaining 8 bits reserved for host addressing.

IPv4 reserves some addresses for special purposes such as private (local) networks or multicast addresses. The following ranges are reserved for private networks :

Prefix length Start End
/8 10.0.0.0 10.255.255.255
/12 172.16.0.0 162.31.255.255
/16 192.168.0.0 192.168.255.255

In IPV6, the reserved address blocks for private networks are referred to as unique local addresses (ULA) and they use the routing prefix fc00::/7.

IP addresses can be static (fix) or dynamic. Static IP addresses are manually assigned to a computer by the network administrator. Dynamic IP addresses are assigned either by a server (router) using Dynamic Host Configuration Protocol (DHCP) or by the computer itself, as in Zeroconf. In the last case of address autoconfiguration (link-local address) the address block 169.254.0.0/16 is reserved in IPv4 networks and the block fe80::/10 in IPV6 networks.

Subnets

In IPV4 a subnet mask is used to indicate how the IP address is divided into network and host parts. A subnet mask is made by setting network bits to all “1”s and setting host bits to all “0”s. For example, 255.255.255.0 is the network mask for the 192.168.1.0/24 prefix.

Routing

Routing is the process of selecting best paths in a network. Routing schemes differ in their delivery semantics:

  • unicast : destination is a single specific node in the network
  • broadcast : destinations are all nodes in the network
  • multicast : destinations are all interested nodes in the network
  • anycast : one to many routing topology
  • geocast : destinations are all nodes in a geographical area

Unicast is the dominant form of message delivery on the Internet.

DNS Resolver

The main job of a DNS server is to store DNS name data and serve it when it receives requests. The main job of a DNS resolver is to transform a DNS name into an IP address, but this is only one of several types of resolution services performed by DNS. The process to resolve an hostname to an ip address is normally called dns lookup.

Reverse DNS lookup or reverse DNS resolution (rDNS) is the determination of a domain name that is associated with a given IP address.

Accessing local virtual hosts

There are different ways that local websites can be viewed from other computers which are connected within the same LAN. These computers can be desktops or laptops running Windows, Mac OSX, Linux or be mobile devices like tablets (iPad, Samsung, …) or smart phones (iPhone, Android, …).

  • Use the LAN IP of the server : downside – only one website can be accessed
  • Use the LAN host name of the server : downside – only one website can be accessed
  • Use a LAN-wide hosts file : downside – this doesn’t work on iOS and most other mobile devices
  • Use own DNS server : downside – setup is complex ; DNS server must always be turned on
  • Use a Wi-Fi router with DNS Masquerading : downside – only a few routers support this option
  • Use registered domain names : downside – all website domain names must have a common base; works only with Internet access
  • Use a HTTP proxy server : downside – multiple

We are analyzing now what solution to adapt for a real network case, related to the specific RadioLogic project.

RadioLogic project requirements

RadioLogic is an university education tool for radiologists which uses three websites, working as virtual hosts :

  • www.radiologic.fr : hosted on Amazon AWS, this website provides the tools and data for public users
  • local.radiologic.fr : hosted on a local server, this website provides the tools and data for private users on a local network
  • dev.radiologic.fr : hosted on a local server, this website provides the beta versions of new tools and data for testing before deployment on the public and private hosts

If possible, the IT consumerization policy BYOD (Bring your own device) is promoted allowing the radiologists in residence to use their own devices. The local server is a MacBookAir laptop running OSX Yosemite 10.10.5 or later. The clients are iPads running iOS 8.1.4 or later. Both the server and the clients will be used for other purposes.

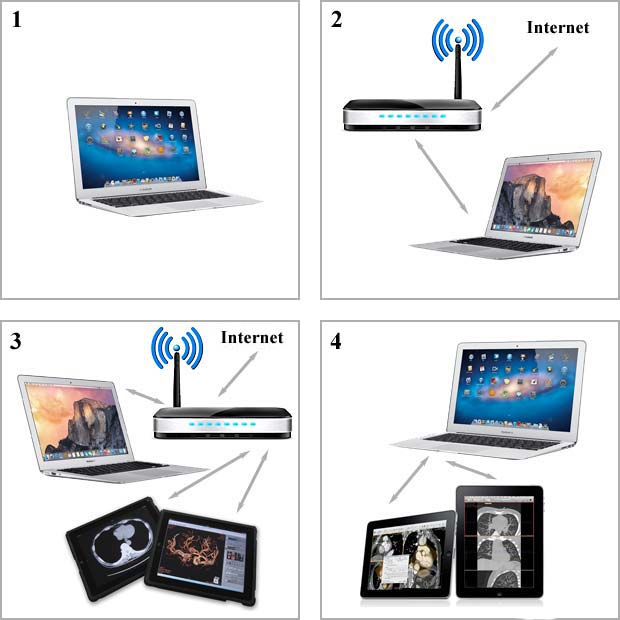
There exist four operational modes :

  1. The server is used as standalone client without Internet connection
  2. The server is used as standalone client with an Internet connection through a Wi-Fi router
  3. An iPad is used as client with an Internet connection through the same Wi-Fi router (same local network)
  4. An iPad is used as client with a local AdHoc Wi-Fi Connection (SSID = radiologic-open) established by the server

The following figure shows the four operational modes.

Four

RadioLogic : four operational modes

The project requirement is that the same host names are used in each operation mode to access the three websites. Let’s examine how to achieve this goal.

Server without Internet connection used as a client

Without Internet connection, it’s not possible to access the public website www.radiologic.fr. To access the local websites local.radiologic.fr and dev.radiologic.fr, the most simple solution is to use the internal hosts file available on every desktop computer (Windows, Linux, Mac OSX, …). This configuration file for the loopback interface is located at /private/etc/hosts on the Mac OSX, but it’s also accessible through the more traditional location /etc/hosts. This file is configured as follows :

##
# Host Database
#
# localhost is used to configure the loopback interface
# when the system is booting.  Do not change this entry.
##
127.0.0.1	localhost
127.0.0.1       local.radiologic.fr
127.0.0.1       dev.radiologic.fr
255.255.255.255	broadcasthost
::1             localhost

The default values are the IP addresses for the localhost in IPV4 and IPV6 and the broadcasthost for IPV4. The radiologic hosts have been added.

Server with Internet connection used as a client

Accessing the public website www.radiologic.fr is now possible and the preceding loopback solution is also working.

iPad used as a client with Internet connection in local network

There is no problem to access the public website www.radiologic.fr, but the simple loopback solution to access the local hosts is not possible on mobile devices without jailbreaking.

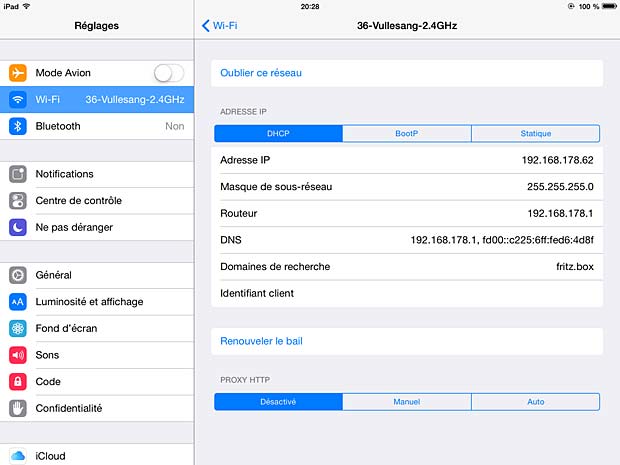
The next possibility consists in using a local DNS server. Setting up a DNS server on the Mac laptop with primary zones for the local hosts needs a parameter change in the DNS configuration of the iPad Wi-Fi connection.

Wi-Fi

Wi-Fi settings in iPad

We must change the IP address of the DNS server, assigned by the Internet provider via the Wi-Fi router, by the local IP address of the Mac laptop, which leads to various problems :

  • The IP address of the Mac laptop changes when you use it in a different local network or when the DHCP server assigns a new address in the same network at booting
  • The DNS server of the Mac laptop must be continuously running to use the iPad for Internet surfing
  • Using an additional DNS server with forwarding to a public DNS server to set up an Internet connection may lead to delays or performance problems
  • Frequent changes of the DNS addresses on an iPad is an error-prone process for a normal user

I recommend to never change the network parameters assigned by the Internet provider on your router and local devices to avoid all sort of problems.

There exist a third solution to access the local hosts in our case, which some developers consider as a hack : using the public DNS server to point towards the internal private IP address of the Mac computer.

This solution is simple and feasible in our case because all hosts use the same domain name radiologic.fr which is registered and managed in a public DNS server. Instead of creating an A record for both dev.radiologic.fr and local.radiologic.fr we can use a wild-card (*) to catch all DNS records.

Some reasons to not use a public DNS server with local IP addresses, invoked by other developers, are the following :

  • leak of internal informations to third parties
  • it’s not considered best practice
  • external clients may inadvertently be redirected to a host on their own local network
  • it’s likely to cause confusion and human miscommunication
  • risk of mail delivery timeouts or mail bounces
  • risk of DNS rebinding attacks

I don’t agree with these arguments that I consider as minor problems or not applicable in specific cases. I think the solution is not a such bad idea in practice and I will use it in the RadioLogic project.

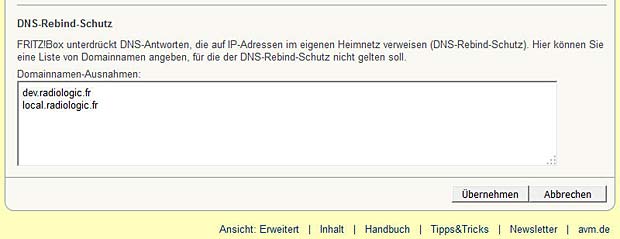
Some routers provide a security feature to protect against DNS rebinding attacks by suppressing DNS responses that refer to IP addresses in the home network. My router FRITZ!Box 7390 is such a device. It allows to enter domain names in a list of exceptions where this protection should be disabled. In our case these are dev.radiologic.fr and local.radiologic.fr.

fri

Exceptions to the DNS rebinding protection in the Fritz!Box router 7390

iPad used as a client connected to an AdHoc network

The only workable solution in this case is the use of a local private DNS server. You may ask what about the problems listed in the preceding chapter ? Well, these are no longer issues in the case of an AdHoc Wi-Fi network :

  • The self-assigned IP address of the AdHoc Wi-Fi interface in the range 169.254.0.0/16 can be defined as static
  • The DNS server is always running when the Mac laptop runs the AdHoc network
  • Without Internet connection there is no forwarding to a public DNS server
  • The DNS address is changed once in the configuration of the AdHoc Wi-Fi connection which is different from the configuration of the other Wi-Fi infrastructure connections

Search Domain

In iOS and OSX Wi-fi settings, each Wi-fi connection has a Search Domains section which is simply a convenience that allows the system to convert host names to Fully Qualified Domain Names (FQDN). Anyplace you might use a FQDN, such as in the location bar of Safari,  you can use a simple host name. If the system can’t resolve that host name to an IP address, then it will try appending the search domain to the host name and try again. If you specified more than one search domain, it will try them each in order.

If we set the search domain to radiologic.fr, we can use the host names dev and local to access the corresponding websites. I didn’t opt for this solution because it introduces more complexity and an additional delay in setting up connections.

Network Diagnose Tools

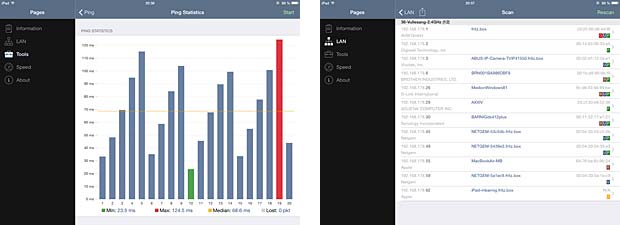
There are several tools available for iPads to diagnose access problems in local networks:

net

iPad Network Analyzer : ping statistics – LAN overview

Links

The following list provides links to websites with additional informations about accessing local virtual hosts :

Mac OSX Wireless Networks

Last update : September 17, 2015

AdHoc Wi-Fi Networks

Sometimes it’s useful to create a WLAN (wireless network) between two or more Wi-Fi-enabled computers without using an Wi-Fi router. These computer-to-computer networks are usually referred to as AdHoc wireless networks.

create

Create an ad-hoc Wi-Fi network on Mac OSX

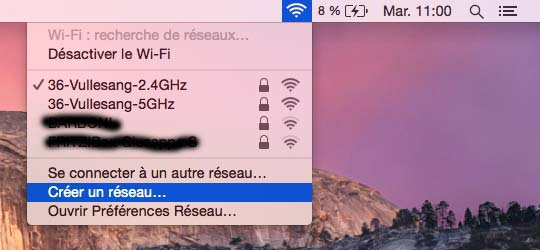
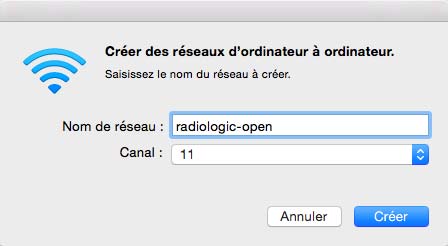
On a Mac OSX (Yosemite 10.10.5) it’s easy to set up such a network. Choose Create Network from the Wi-Fi status icon in the menu bar. Enter a name (in my case : radiologic-open) for the new network and select the channel (default channel = 11). You will notice that there is no password protection to secure the network. A WEP (Wired Equivalent Encryption) algorithm was however available in previous versions of the OSX system. WEP was Wi-Fi’s first encryption standard and was almost intentionally designed to be weak due to issues related to the US export policies about encryption. WEP was deprecated in 2003 and replaced by WPA2 (Wi-Fi Protected Access) by the Wi-Fi Alliance.

In Yosemite, Apple killed WEP once for all, without replacing it by another protection method in AdHoc mode.

open

Chose name and channel for the AdHoc network

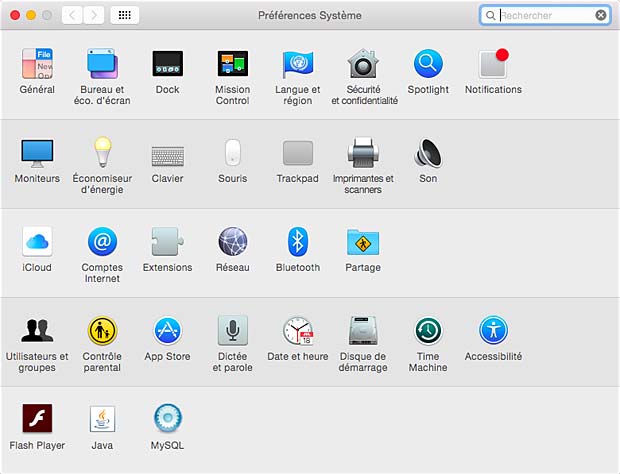
If the icon isn’t in the menu bar, choose Apple menu > System Preferences, then click Network (réseau). Click Wi-Fi and select the Show Wi-Fi status in menu bar checkbox.

Mac OSX

Mac OSX System Preferences

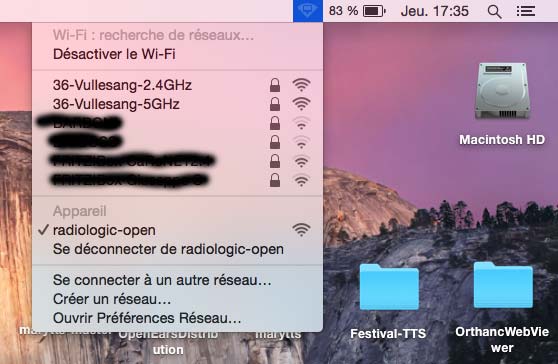
The Wi-Fi status menu shows the established connection with the radiologic-open network. The menu allows an easy logout and reconnection to another Wi-Fi network. An automatic logout occurs when the Mac screen is powered off.

Radoio

Wi-Fi status menu shows the AdHoc network active

Infrastructure Wi-Fi networks

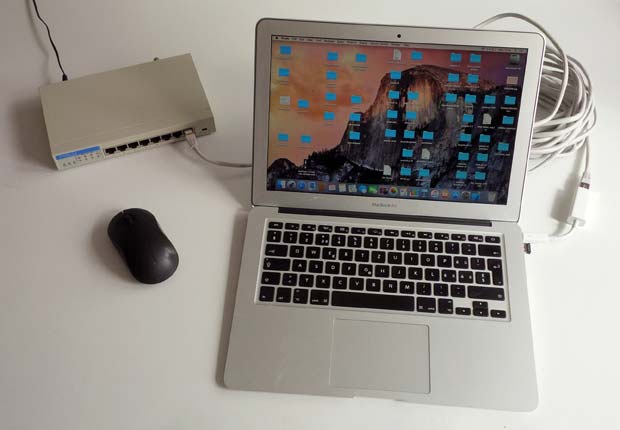
There exist a second possibility to set up a Wi-Fi network on Mac OSX. The computer is configured as a software Wi-Fi base station. This allows to share an Internet connection and offers a password protection, but it has another inconvenience. You need a working wired Ethernet connection between your Mac and a hub, even if the hub is not connected to the Internet. The next picture shows my test setup: my MacBookAir is connected via a Ethernet-Thunderbolt interface to an ancient 10 Mbit/s Ethernet hub.

Thunderbolt-Ethernet

MacBookAir connected with Thunderbolt-Ethernet interface to hub

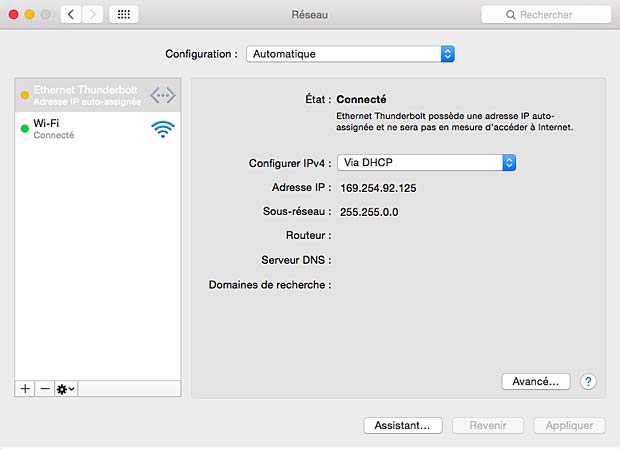
First you need to configure the Ethernet-Thunderbold interface. Go to Network in System Preferences and select the automatic configuration. The interface gets a self-assigned IP address in the range 169.254.x.x.

network

Ethernet-Thunderbolt automatic configuration

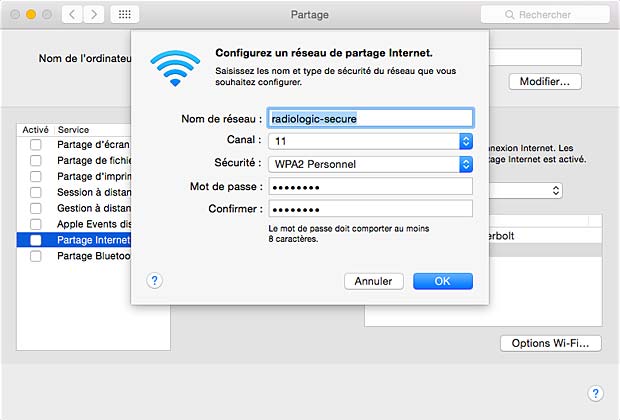
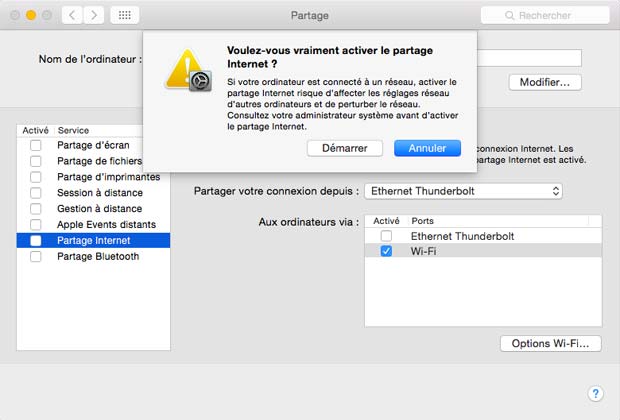
In the next step go to the Sharing Preference Pane in the System Preferences. Select Ethernet-Thunderbold as source port and Wi-Fi as destination port. Select Wi-Fi options to enter a name (in my case : radiologic-secure) of the network, to select a channel and to define a password (minimum 8 characters; numbers are not recognized on BlackBerry and Android).

Internet Sharing Wi-Fi network configuration

Internet Sharing Wi-Fi network configuration

Finally check the Internet sharing checkbox and confirm the settings to activate the connection.

Share

Activate the Internet sharing

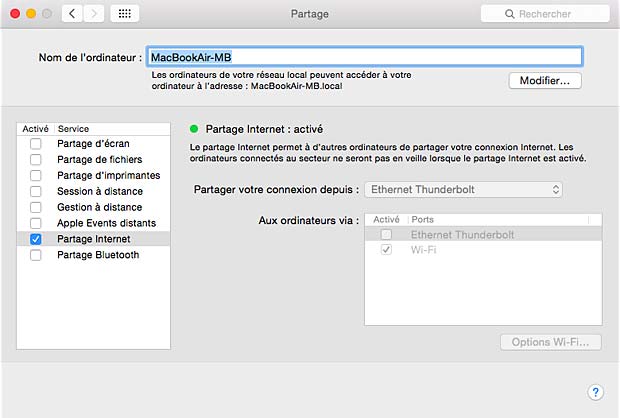
The resulting pane is shown below.

rads

Activated Internet sharing pane

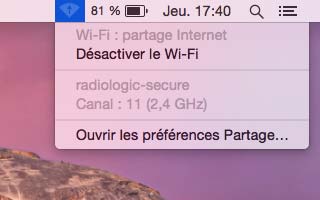
The Wi-Fi status is updated automatically. To log out, desactivate the Wi-Fi connection in the corresponding menu. An automatic logout occurs when the Mac screen is powered off.

Radio

Wi-Fi status menu showing Internet sharing

The following table shows which of my devices are capable to connect to the Mac OSX AdHoc and Infrastructure networks.

Device Wi-Fi AdHoc Wi-Fi infrastructure
iPad OK OK
iPhone OK OK
BlackBerry  network not shown network joined, but
no access to host
Samsung Tablet (Android 4.2.2) network not in range network joined, but
no access to host
Laptop Vista no connection network joined, but
no access to host
Desktop Windows 8.1 network not shown OK
Laptop Debian no connection OK

Wi-Fi Diagnostic

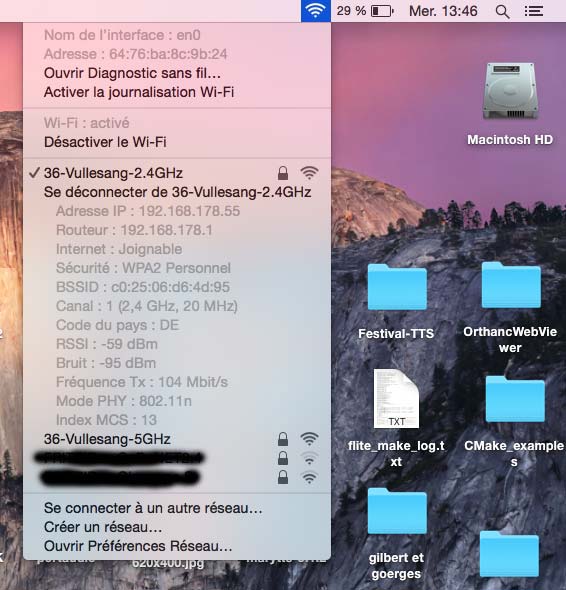
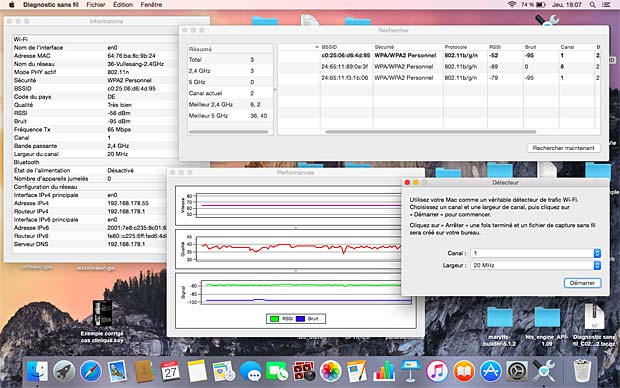
To detect the reasons why some devices don’t connect to the Mac OSX Wi-Fi AdHoc or Infrastructure networks, you can use a WLAN analyser. Mac OS X Yosemite has an in-built Wi-Fi scanner to help you find the best Wi-Fi channel. When you hold down the option key ⌥ (next to the CTRL key) and select the Wi-Fi icon in the menu bar, a secret dropdown menu opens.

secret

Secret Wi-Fi dropdown menu in Mac OSX Yosemite

Open Wireless Diagnostics and click it. After you have gotten to the page and have opened up the Wireless Diagnostics window, go to the top left of your menu bar and click on Window where you find several options: Informations, history, scan, performance, detection, …  Some results are shown below.

Mac OSX Wi-Fi Analyser

Mac OSX Wi-Fi Analyser

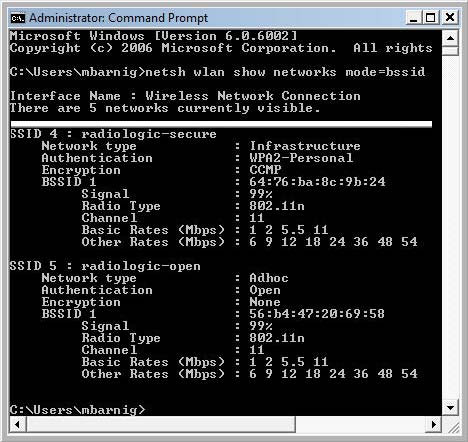
Another WLAN tool is available on Windows computers. When you enter the command

netsh wlan show networks mode=bssid

in the command window, you will get the following results :

Wi-Fi

Microsoft Wi-Fi Analyser

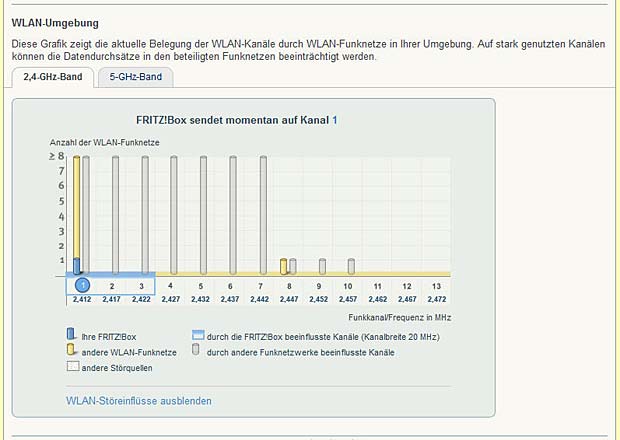
A third WLAN tool is integrated in my Wi-Fi router FritzBox 7390. Various wireless networks in my neighborhood are shown, but nor the channels used by the Mac OSX nor the names of these networks are listed. I don’t know why ?

funkkanale

Wi-Fi channels used in proximity of the Fritzbox

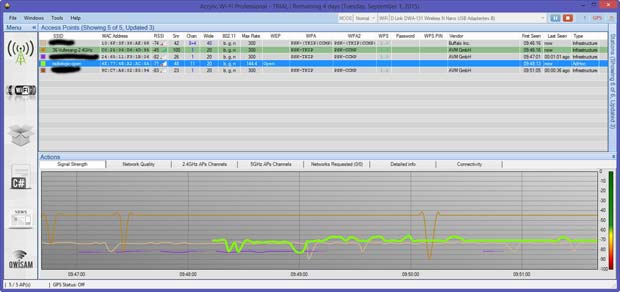
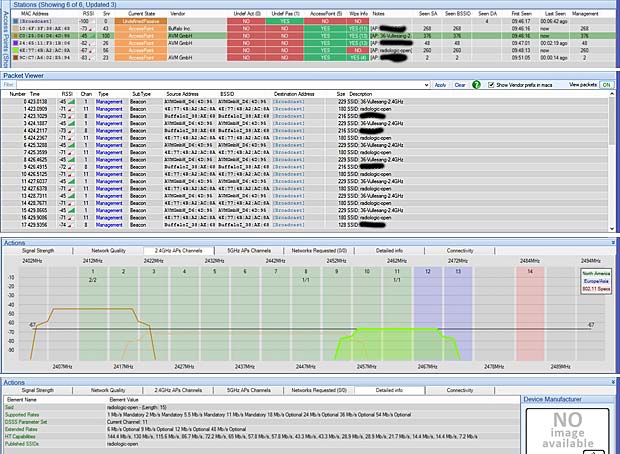
There are also several external software tools for Wi-Fi-analysis available, for example Acrylic Wi-Fi Free or Acrylic Wi-Fi Professional. The main window (Access points,  Signal strength) of Acrylic is shown hereafter :

Acrlylic Wi-Fi Analyser

Acrlylic Wi-Fi Analyser

Some additional windows (stations, packet viewer, 2,4 GHz APs channels, detailed info) are shown below :

Various Acrylic results

Various Acrylic results

Wi-Fi Assessment

Several methodologies are available dealing with safety aspects of wireless networks, for example :

Links

The following list shows links to websites providing additional informations about Wi-Fi networks, related to Mac OSX.

DICOM image viewers

Last update : May 30, 2016

Referring to my recent post about the DICOM standard, this contribution presents an overview about an important entity in the medical imaging workflow : DICOM image viewers. The list is not exhaustive; I did the following segmentation to present my personal selection of current DICOM image viewers :

  1. Reference viewer
  2. Reference toolkits
  3. Open source viewers
  4. Free proprietary viewers
  5. Licensed commercial viewers
  6. Mobile viewer apps
  7. Other viewers

1. Reference DICOM Viewer

Today one project is generally considered as a reference for DICOM applications : OsiriX.

OsiriX

The OsiriX project started in November 2003. The first version was developed by Antoine Rosset, a radiologist from Geneva, Switzerland, working now at the La Tour Hospital  in Geneva. He received a grant from the Swiss National Fund to spend one year in UCLA, Los Angeles, with Prof. Osman Ratib, to explore and learn about medical digital imaging. In October 2004, Antoine Rosset went back to the Geneva University Hospital in Switzerland, to continue his career as a radiologist, where he published an OsiriX reference article in June 2004 in the Journal of Digital Imaging. Joris Heuberger, a mathematician from Geneva, joined the project in March 2005 on a voluntary fellowship of 6 months in UCLA, Los Angeles. In June 2005, OsiriX received two prestigious Apple Design Awards : Best Use of Open Source and Best Mac OS X Scientific Computing Solution. Osman Ratib, Professor of Radiology in UCLA, returned to Geneva at the end of 2005 as the chairman of the Nuclear Medicine service.

In March 2009, Antoine Rosset, Joris Heuberger and Osman Ratib created the OsiriX Foundation to promote open-source in medicine. In February 2010, Antoine Rosset and Joris Heuberger created the company Pixmeo to promote and distribute the OsiriX MD version, certified for medical imaging. This version complies with the European Directive 93/42/EEC concerning medical devices. The price for a single licence is 678 EUR. The free lite version can be downloaded from the OsiriX website, the source code is available at Github.

OsiriX runs on Mac OSX and is released under the version 3 of the GNU Lesser General Public License. The current version is 7.0 and was released on December 7, 2015. Osirix can also be configured as a PACS server. The power of OsiriX can be extended with plugins.

OsririX Lite

OsririX Lite

An Osirix HD version for the iPad is available at the AppStore for 49,99 EUR.

2. Reference DICOM toolkits

DICOM toolkits are more than simple viewers; they are a complete set of tools, code samples, examples, documentation, tutorials etc to develop great healthcare applications.

DCMTK

DCMTK is a collection of libraries and applications implementing large parts the DICOM standard. It includes software for examining, constructing and converting DICOM image files, handling offline media, sending and receiving images over a network connection, as well as demonstrative image storage and worklist servers. DCMTK is is written in a mixture of ANSI C and C++. It comes in complete source code and is made available as open source software.

DCMTK is an ancestor of DICOM applications. In 1993, before the official release of the standard, a DICOM prototype implementation was created by OFFIS, the University of Oldenburg and the CERIUM (Centre Européen d’Imagerie à Usage Médical) research centre in Rennes (France) on behalf of the European Committee for Standardization (CEN/TC251/WG4).

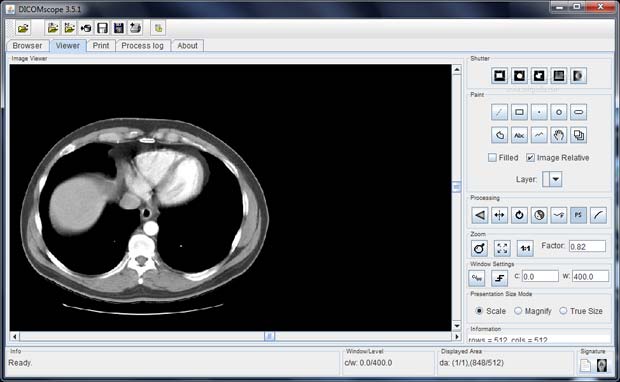
The current version of DCMTK is 3.6.1, released in June 2015. The related snapshot is available at the dicom.offis.de website. DICOMscope is the related free DICOM viewer which can display uncompressed, monochrome DICOM images from all modalities and which supports monitor calibration according to DICOM part 14 as well as presentation states. DICOMScope 3.6.0 for Windows, implemented in a mixture of Java and C++, was released in 2003. DICOMscope can’t be installed on newer Windows systems (Vista, Windows 7, Windows 8.1), an error 105 (setup.lid missing) is issued.

DICOMscope

DICOMscope version 3.5.1 (archive image)

Some DCMTK modules, especially those that are not part of the free toolkit, are covered by a separate license which can be found in the COPYRIGHT file in the corresponding module directory. These tools can be evaluated during a period of four months, any further use of the software requires a full licence agreement, free of charge.

The following sub-packages are part of DCMTK :

  • config: configuration utilities for dcmtk
  • dcmdata: a data encoding/decoding library and utility apps
  • dcmimage: adds support for color images to dcmimgle
  • dcmimgle: an image processing library and utility apps
  • dcmjpeg: a compression/decompression library and utility apps
  • dcmjpls: a compression/decompression library and utility apps
  • dcmnet: a networking library and utility apps
  • dcmpstat: a presentation state library and utility apps
  • dcmrt: a radiation therapy library and utility apps
  • dcmsign: a digital signature library and utility apps
  • dcmsr: a structured report library and utility apps
  • dcmtls: security extensions for the network library
  • dcmwlm: a modality worklist database server
  • dcmqrdb: an image database server
  • oflog: a logging library based on log4cplus
  • ofstd: a library of general purpose classes

Each sub-package (module) contains a collection of sub-modules (functions). For example, the networking library dcmnet contains the following command line tools :

  • dcmrecv: Simple DICOM storage SCP (receiver)
  • dcmsend: Simple DICOM storage SCU (sender)
  • echoscu: DICOM verification (C-ECHO) SCU
  • findscu: DICOM query (C-FIND) SCU
  • getscu: DICOM retrieve (C-GET) SCU
  • movescu: DICOM retrieve (C-MOVE) SCU
  • storescp: DICOM storage (C-STORE) SCP
  • storescu: DICOM storage (C-STORE) SCU
  • termscu: DICOM termination SCU

dcm4che

dcm4che2 is a collection of open source applications and utilities for the healthcare enterprise developed in the Java programming language. dcm4chee2 is a DICOM Clinical Data Manager system.

dcm4che2 contains a number of useful sample applications that may be used in conjunction with dcm4chee, with another archive application, or to operate on DICOM objects in a standalone fashion. A list of the dcm4che2 utilities is shown hereafter :

  • dcm2txt- Convert a DICOM object to text
  • dcm2xml- Convert a DICOM object to XML
  • dcmdir- Manipulate a DICOM dir
  • dcmecho – Initiate a C-ECHO command as an SCU
  • cmgpwl – Query a General Purpose Worklist SCP
  • dcmmwl – Query a Modality Worklist SCP
  • dcmof – Simulate an Order Filler application
  • dcmqr – Perform C-FIND, C-GET and C-MOVE operations as an SCU
  • dcmrcv – DICOM receiver (C-STORE SCP)
  • dcmsnd – Perform C-STORE operations as an SCU
  • dcmups – Unified Worklist and Procedure Step SCU
  • dcmwado – Initiate DICOM WADO requests
  • jpg2dcm – Convert a JPEG image to DICOM
  • logger – Log files to a Syslog destination
  • mkelmdic – Create the serialized dcm4che2 DICOM Dictionary
  • mkuiddic – Create the dcm4che2 UID dictionary
  • mkvrmap – Create the dcm4che2 VR Mappings
  • pdf2dcm – Convert a PDF document to DICOM
  • rgb2ybr – Convert pixel data from YBR to RGB format
  • txt2dcmsr – Convert text to a DICOM Structured Report
  • xml2dcm – Convert XML to DICOM

The dcm4che history states that back around the year 2000, Gunter Zeilinger wrote the popular JDicom utility suite using commercial Java DICOM Toolkit (JDT). After this experience, he decided to develop his own toolkit and to name it after Che Guevara.
dcm4che and dcm4chee are licensed under an MPL/GPL/LGPL triple license, similar to Mozilla.

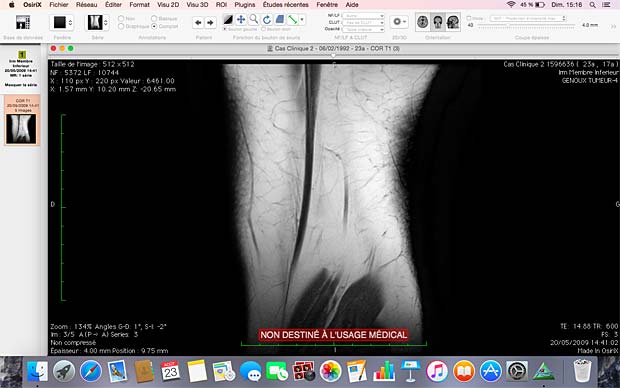
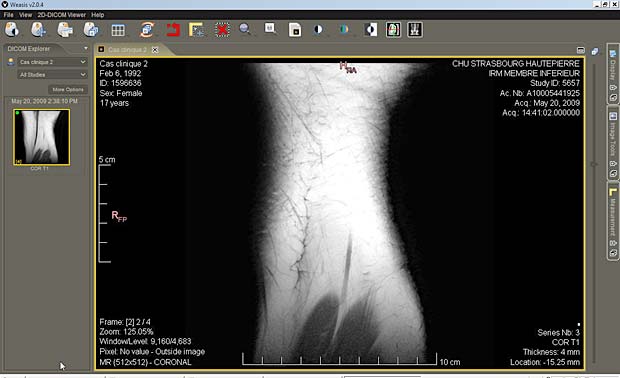
The dcm4che DICOM viewer is called Weasis. The current version is 2.0.4, released on June 23, 2015.

WEASIS version 2.0.4

WEASIS version 2.0.4

Grassroots DICOM

Grassroots DiCoM is a C++ library for DICOM medical files. It is accessible from Python, C#, Java and PHP. It supports RAW, JPEG, JPEG 2000, JPEG-LS, RLE and deflated transfer syntax. It comes with a super fast scanner implementation to quickly scan hundreds of DICOM files. It supports SCU network operations (C-ECHO, C-FIND, C-STORE, C-MOVE).

The current version is gdcm-2.6.3, released on January 27, 2016. The GDCM source code is available at Github. A Wiki is available at Sourceforge, a reference to GDCM is available at Wikipedia. The project is developed by Mathieu Malaterre (malat) from Lyon, France.

3. Open Source DICOM Viewers

Most open source DICOM viewer projects are web viewers based on HTML5, CCS3 and Javascript. The big advantage of these viewers is the cross-platform compatibility; they can be used with any modern browser.

DICOM web viewers are presented in a separate contribution. Among them are the following open source projects :

  • Cornerstone
  • DWV
  • Papaya
  • jsDICOM
  • webDICOM
  • dcmjs

There are also some non web open source DICOM viewers :

  • 3DSlicer
  • 3DimViewer

3DSlicer

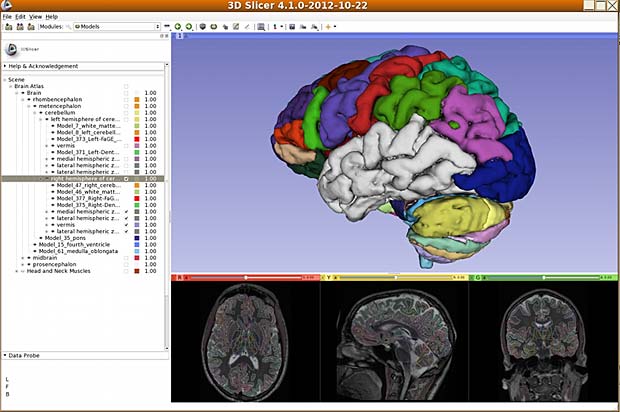
3D Slicer is a free and open source software package for image analysis and scientific visualization. It’s more than a simple DICOM viewer. This outstanding project started as a masters thesis project between the Surgical Planning Laboratory at the Brigham and Women’s Hospital and the MIT Artificial Intelligence Laboratory in 1998.

3D Slicer is written in C++, Python, Java and Qt and can be compiled for use on multiple computing platforms, including Windows, Linux, and Mac OS X. 3D Slicer needs a powerful computer to run. The current version is 4.5.0-1, released on November 11, 2015. It’s distributed  under a BSD style, free, open source license. More than 50 plug-ins and packages of plug-ins are available.

3D Slicer

3D Slicer

The main developers are now Steve Pieper, Slicer’s principal architect and Ron Kikinis, Principal Investigator for many Slicer-related projects. The names of all contributors are available at the 3D slicer.org website.

3DimViewer

3DimViewer is a lightweight 3D viewer of medical DICOM datasets distributed as open source software. The viewer is multiplatform software written in C++ that runs on Windows, Linux and Mac OSX systems.

3DimViewer is developed by 3Dim Laboratory s.r.o., a company specializing in applications of modern computer graphics in medicine and developing innovative solutions. Founded since 2008, the company focuses on medical image processing, 3D graphics, geometry processing and volumetric data visualization. The company office is located in Brno, Czech Republic, next to many high tech companies inheriting the spirit of South Moravian Innovation Centre.

3DimViewer

3DimViewer version 2.2

The current version of 3DimViewer is 2.2, released on February 6, 2015. Several plugins are available to extend the functions. Binaries are available for download on the 3DimLab website, source code is available at BitBucket.

GDCMviewer

GDCMviewer is the simple tool that show how to use vtkGDCMImageReader. It is basically only just a wrapper around GDCM. The tool is meant for testing integration of GDCM in VTK.

4. Free Proprietary DICOM Viewers

Most free proprietary DICOM viewers are copyrighted by their owner and are available for use, as is, free of charge, for educational and scientific, non-commercial purposes. Some of them are included on DICOM CDs provided by the hospitals to the patients.

Mango

Mango (short for Multi-image Analysis GUI) is a viewer for medical research images, developed by Jack L. Lancaster, Ph.D. and Michael J. Martinez at the University of Texas.

There are several versions of Manga available :

  • Manga Desktop, a Java application running on Windows Mac OSX and Linux
  • iMango, running on iPads and available at the AppStore
  • webMango, running as a Java applet
  • Papaya, running as HTML5 application in all browsers

The software and data derived from Mango software may be used only for research and may not be used for clinical purposes. If Mango software or data derived from Mango software is used in scientific publications, the Research Imaging Institute UTHSCSA must be cited as a reference.

Mango DICOM viewer

Mango DICOM viewer

Orpalis

The Orpalis DICOM Viewer is a free tool for medical staff to view DICOM files. The current version 1.0.1, released on June 20, 2014, should run on any 32- or 64-bit Windows System, but I experienced serious problems on my Windows 8.1 system (thumbnails are not displayed, frequent viewer crashes, …). The ORPALIS DICOM Viewer is based on the GdPicture.NET SDK.

Orpalis DICOM viewer

Orpalis DICOM viewer

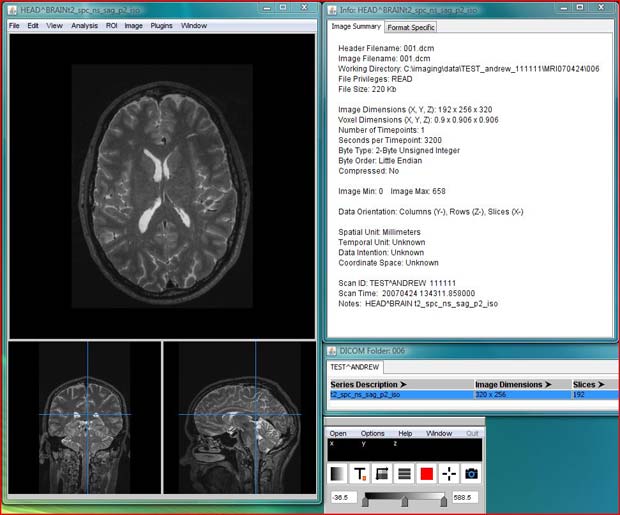
MicroDICOM

MicroDicom is an application for primary processing and preservation of medical images in DICOM format, with an intuitive user interface and being free for use and accessible to everyone. MicroDicom runs on Windows, the current version is 0.9.1, released on June 2, 2015.

MicroDicom viewer

MicroDicom viewer

EMV Medical Viewer

The EMV viewer is developed by Escape, which was founded in 1991 and is based in downtown Thessaloniki, Greece. EMV 4 for Windows was released on October 10, 2014, EMV 4.4.1 for Mac OSX was released on July 21, 2015.

You can download and evaluate the software for free, but you need a license for using it in a commercial environment. The price for one license is 245 EUR, for use on up to three computers.

5. Licensed commercial DICOM viewers

Photoshop

Since version 10 (CS3) launched in April 2007, Photoshop provides a comprehensive image measurement and analysis tools with DICOM file support.

Photoshop CS3 with DICOM support

Photoshop CS3 with DICOM support

DICOMIZER

Dicomizer is a Point-Of-Care Imaging and Reporting tool provided by H.R.Z Software Services LTD in Tel-Aviv, Israel. The company is specialized in developing Medical Device, Healthcare IT, DICOM and HL7 solutions and provides medical imaging consultation, development services and professional courses. The company was founded in 2002 (formerly RZ Software Services) by Roni Zaharia, a medical imaging and connectivity expert, who is acting as its CEO. Roni Zaharia is the author of the blog DICOM is easy, providing useful news about medical images and an outstanding DICOM tutorial. Dicomizer works on Windows, the current version is 5.0. The price of a licence is $470 USD, a free evaluation version is available. The annual update costs are  $120 USD. Dicomizer can also be used as an DICOM image generator.

DICOMIZER

DICOMIZER version 4.1

H.R.Z Software Services LTD provides also the following medical toolkits :

  • RZDCX : Fast Strike DICOM Toolkit
  • DSRSVC : extensible DICOM Server (PACS) for OEM
  • HL7Kit Pro : WYSIWYG HL7 Integration Engine for MS SQL Server

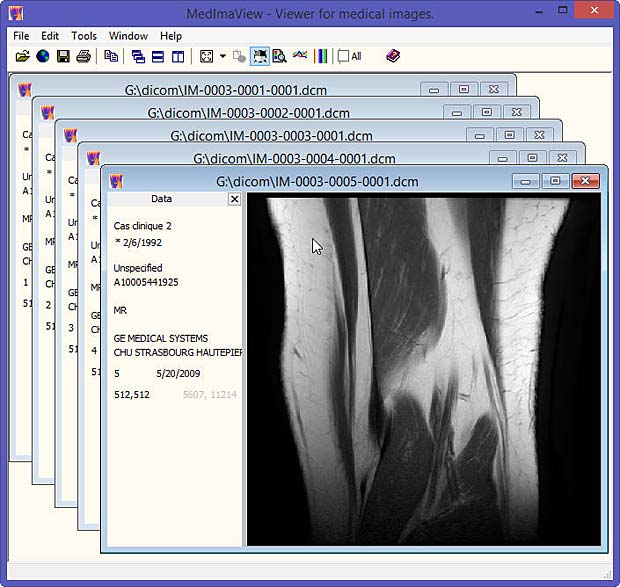
MedImaView – PowerDicom

MedImaView is a multi-modality DICOM viewer with an intuitive Windows Graphical User Interface. It’s part of PowerDicom Technologies, an All-in-One application for handling DICOM files developed by DICOM Solutions, an MHGS company. Licenses for PowerDicom (version 4.8.6 released on May 4, 2015) are available in a price-range from 39 EUR to 310 EUR. PowerDicom allows also the generation of DICOM images. A free trial version can be downloaded from the DICOM Solutions website. MedImaView (version 1.8) is free for personal use and students.

MedimaView DICOM viewer

MedimaView DICOM viewer

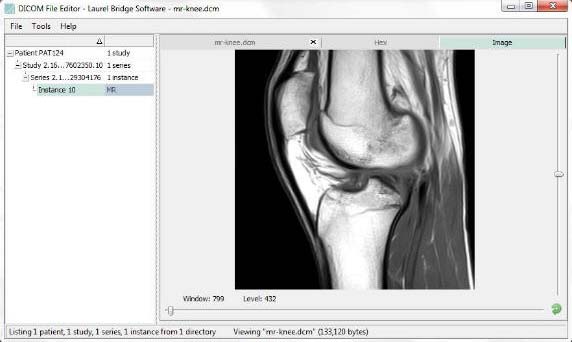
DICOM PowerTools

DICOM PowerTools are developed by Laurel Bridge who provides imaging workflow solutions and DICOM software products to the medical imaging industry. PowerTools are a suite designed for the testing, troubleshooting, or debugging of applications that use DICOM communications. PowerTools also provides for the viewing, repair, or creation of DICOM data sets and their contents.

The current version is 1.0.34, released on November 24, 2015.

PowerTools File Editor

PowerTools File Editor

RadiAnt

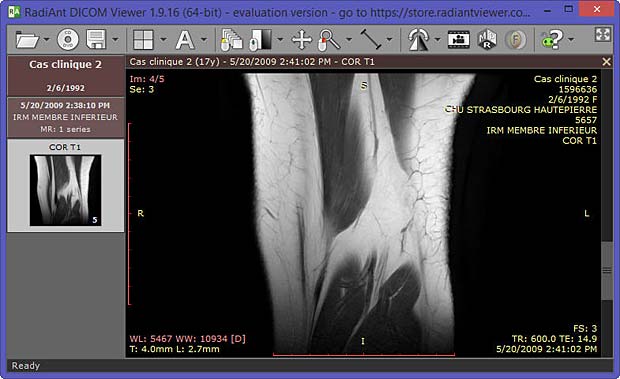
RadiAnt is a DICOM viewer for medical images designed with an intuitive interface and unrivaled performance. It runs on Windows, the latest version is 2.2.8.10726, released on December 11, 2015. The prices for a license range from 72 EUR to 400 EUR. A free evaluation version is available. RadiAnt is not certified as a medical product and is not intended for diagnostic purposes. RadiAnt is developed by Medixant, a small, privately funded company that was first formed by Maciej Frankiewicz in 2011 in Poznan, Poland.

RadiAnt DICOM viewer

RadiAnt DICOM viewer

CODONICS Clarity Viewer

Headquartered in Cleveland, Ohio, Codonics develops, designs, sells and supports leading-edge medical imaging and information management devices used in diagnostic imaging.
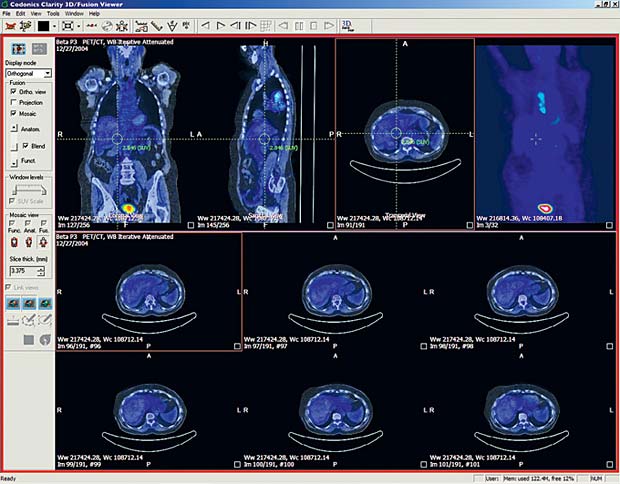
Codonics Clarity Viewer features simple image navigation and selection, an intuitive user interface, quick viewer launch and rapid image loading. The Codonics Clarity 3D/Fusion Viewer is extremely useful for viewing diagnostic imaging results. It is a comprehensive PET/CT viewer that is simple to use for single or comparison study review. All basic features of the Codonics Clarity Viewer are also included.

Codonics

Codonics Clarity 3D/Fusion viewer

MatLab Dicom Toolbox

The Image Processing Toolbox of MatLab includes import, export and conversion functions for scientific file formats, amomg them DICOM files. The available functions are dicomanon, dicomdict, dicomdisp, dicominfo, dicomlookup, dicomread, dicomuid, dicomwrite. A tutorial shows how to write data to a DICOM file.

6. Mobile DICOM viewer apps

The mobile DICOM viewers are presented in a separate contribution.

7. Other DICOM viewers

The following list provides links to additional DICOM viewers developed by the industry’s leading medical imaging equipment suppliers and by independant developers :

Links

The following list shows links to websites with additional informations about DICOM viewers :

DICOM TransferSyntaxUID

Referring to my recent post about the DICOM standard, the list of all valid transfer syntaxes is shown below. A DICOM transfer syntax defines how DICOM objects are serialized to transmit them through a network or to save them into a file.

The DICOM transfer syntax is specified by the TransferSyntaxUID located in element number (0002, 0010). There exist 35 different DICOM transfer syntaxes, but 14 have been retired from earlier standard versions and will not be supported in future DICOM releases.

The 21 valid DICOM transfer syntaxes are listed in the following table :

TransferSyntaxUID Transfer Syntax Name Comments
1.2.840.10008.1.2 Implicit VR Endian Default
1.2.840.10008.1.2.1 Explicit VR Little Endian
1.2.840.10008.1.2.1.99 Deflated Explicit VR Big Endian
1.2.840.10008.1.2.2 Explicit VR Big Endian
1.2.840.10008.1.2.4.50 JPEG Baseline (Process 1) Default Lossy JPEG 8-bit
1.2.840.10008.1.2.4.51 JPEG Baseline (Process 2 & 4) Default Lossy JPEG 12-bit
1.2.840.10008.1.2.4.57 JPEG Lossless, Nonhierarchical (Processes 14)
1.2.840.10008.1.2.4.70 JPEG Lossless, Nonhierarchical First- Order Prediction
1.2.840.10008.1.2.4.80 JPEG-LS Lossless
1.2.840.10008.1.2.4.81 JPEG-LS Near-Lossless
1.2.840.10008.1.2.4.90 JPEG 2000 Lossless Only
1.2.840.10008.1.2.4.91 JPEG 2000
1.2.840.10008.1.2.4.92 JPEG 2000 Multicomponent Lossless Only
1.2.840.10008.1.2.4.93 JPEG 2000 Multicomponent
1.2.840.10008.1.2.4.94 JPIP Referenced
1.2.840.10008.1.2.4.95 JPIP Referenced Deflate
1.2.840.10008.1.2.5 RLE Lossless
1.2.840.10008.1.2.6.1 RFC 2557 MIME Encapsulation
1.2.840.10008.1.2.4.100 MPEG2 Main Profile Main Level
1.2.840.10008.1.2.4.102 MPEG-4 AVC/H.264 High Profil Level 4.1
1.2.840.10008.1.2.4.103 MPEG-4 AVC/H.264 BD High Profil Level 4.1

Image Manipulations with Javascript

Introduction

Today most computers, graphic cards and monitors can display 16-bit, 24-bit, 32-bit or even 48-bit color depth. The color quality can be selected in the control center of the graphic (video) card.
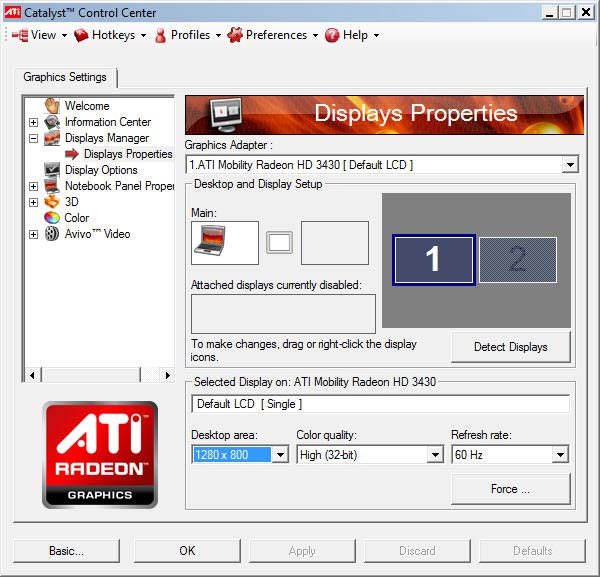
ATI Radeon Control Center Window

Example : ATI Radeon Control Center Window

8-bit-color

In 8-bit color graphics each pixel is represented by one byte, the maximum number of colors that can be displayed at any one time is 256. There are two forms of 8-bit color graphics. The most common uses a separate palette of 256 colors, where each of the 256 entries in the palette map is given red, green, and blue values. The other form is where the 8 bits directly describe red, green, and blue values, typically with 3 bits for red, 3 bits for green and 2 bits for blue.

16-bit color

With 16-bit color, also called High color, one of the bits of the two bytes is set aside for an alpha channel and the remaining 15 bits are split between the red, green, and blue components, allowing 32,768 possible colors for each pixel. When all 16 bits are used, one of the components (usually green) gets an extra bit, allowing 64 levels of intensity for that component, and a total of 65.536 available colors.

24-bit color

Using 24-bit color, also called True color, computers and monitors can display as many as 16.777.215 different color combinations.

32-bit color

Like 24-bit color, 32-bit color supports 16.777.215 colors with an additional alpha channel to create more convincing gradients, shadows, and transparencies. With the alpha channel 32-bit color supports 4.294.967.296 color combinations.

48-bit color

Systems displaying a billion or more colors are called Deep Color. In digital images, 48 bits per pixel, or 16 bits per each color channel (red, green and blue), is used for accurate processing. For the human eye, it is almost impossible to see any difference between such an image and a 24-bit image.

CLUT

A colour look-up table (CLUT) is a mechanism used to transform a range of input colours into another range of colours. It can be a hardware device built into an imaging system or a software function built into an image processing application.

HDR

High-dynamic-range imaging (HDR) is a set of techniques used in imaging and photography to reproduce a greater dynamic range of luminosity than is possible with standard digital imaging or photographic techniques. The aim is to present the human eye with a similar range of luminance as that which, through the visual system, is familiar in everyday life.

Pixel Image

PixelImage 8 x 8

PixelImage 8×8

To dive into the Image Manipulations with Javascript, we will use the Pixel Image shown left which has 8 x 8 pixels and a color depth of 1 bit. The bit value 0 is associated to the color white, 1 means black. We see later that in real systems the colors are inverted (1 = white, 0 = black). In the next steps we will look how to display this image in a browser with HTML5 and javascript.

The following table shows the pixel data for the image. I used the MathIsFun website to do the binary to hexadecimal and decimal conversion.

rows column bits hexadecimal decimal
1 01111110 7E 126
2 10000001 81 129
3 10100101 A5 165
4 10000001 81 129
5 10011001 99 153
6 10000001 81 129
7 11100111 E7 231
8 00111100 3C 60

We can now use the following code to draw the pixels on a canvas :

<body>
<canvas id="pixelboard" width="512" height="512"></canvas> 
<script>
var myCanvas = document.getElementById("pixelboard");
var myContext = myCanvas.getContext("2d");
myContext.fillStyle = "silver";
myContext.fillRect(0, 0, myCanvas.width, myCanvas.height);
myContext.fillStyle = "black";
// here are the pixel data for the 8 rows
var pixelData = [126, 129, 165, 129, 153, 129, 231, 60];
for (i = 0; i < pixelData.length; i++ ) {
 var base2 = (pixelData[i]).toString(2);
 var p = 7; 
 // set pixels in canvas from right to left
 for (j = (base2.length-1); j >= 0; j-- ) {
 if (base2[j] == 1) {
 myContext.fillRect(p * 64, i * 64, 64, 64);
 } // end if
 p--;
 } // end base2
} // end pixelData
</script>
</body>

Click this PixelData link to see it working. The image is stored in 8 bytes.

PNG Image

To draw the picture in the original size of 8×8 pixels, we change the canvas size

<canvas id="pixelboard" width="8" height="8"></canvas> 

and the code line in the inner loop as follows

myContext.fillRect(p, i, 1, 1);

Click this PixelData link to see it working.

We can save the small Pixel image in the browser with a right mouse click as canvas.png file. The size of this PNG image file is 108 bytes, 100 bytes more than the size of the image stored in our javascript.Thats a lot of overhead. Sort od design overkill !

Let’s have a look inside this file with an HexEditor (HxD from Maël Hörz).
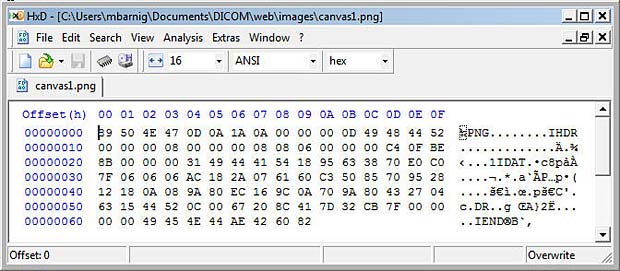
PNG

Anatomy of a small PNG Image File

We can identify the words PNG, IHDR, IDAT and IEND. The PNG format is specified by the W3C. A lite description is available at the FileFormat.Info website. PNG (pronounced “ping”) is a bitmap file format used to transmit and store bitmapped images. PNG supports the capability of storing up to 16 bits (gray-scale) or 48 bits (truecolor) per pixel, and up to 16 bits of alpha data. It handles the progressive display of image data and the storage of gamma, transparency and textual information, and it uses an efficient and lossless form of data compression.

A PNG format file consists of an 8-byte identification signature followed by chunks of data :

  • Header chunk (IHDR) : the header chunk (13 bytes) contains basic information about the image data and must appear as the first chunk, and there must only be one header chunk in a PNG file.
  • Palette chunk (PLTE) : the palette chunk stores the colormap data associated with the image data. This chunk is present only if the image data uses a color palette and must appear before the image data chunk.
  • Image data chunk (IDAT) : the image data chunk stores the actual image data, and multiple image data chunks may occur in a data stream and must be stored in contiguous order.
  • Image trailer chunk (IEND) : the image trailer chunk must be the final chunk and marks the end of the PNG file or data stream.
  • Optional chunks are called ancillary chunks (examples : background, gamma, histogram, transparency, …) and can be inserted before or after the image data chunks. Ten ancillary chunks have been defined in the first PNG version.

Each chunk has the following structure, each chunk has an overhead of 12 bytes :

  • DataLength (4 bytes)
  • ChunkType (4 bytes)
  • Data (number of bytes specified in DataLength)
  • CRC-32 (4 bytes)

The IHDR chunk specifies the following parameters in the 13 data bytes :

  • ImageWidth in pixels (4 bytes)
  • ImageHeight in pixels (4 bytes)
  • BitDepth (1 byte)
  • ColorType (1 byte)
  • Compression (1 byte)
  • Filter (1 byte)
  • Interlace (1 byte)

An analysis of our PixelData PNG image provides the following results :

  • ImageWidth in pixels :  00 00 00 08 (big-endian) > 8 pixels
  • ImageHeight in pixels : 00 00 00 08 (big-endian) > 8 pixels
  • BitDepth : 08 > 8 bit
  • ColorType : 06 > Truecolour with alpha (RGBA)
  • Compression : 00 > default = deflate
  • Filter : 00 > default = adaptive filtering
  • Interlace : 00 > no
  • ImageDataLength : 00 00 00 31 (big-endian) > 49 bytes

In the HexEditor we see that the 49 bytes of deflated image data are :

18 95 63 38 70 E0 C0 7F 06 06 06 AC 18 2A 07 61 
60 C3 50 85 70 95 28 12 18 0A 08 9A 80 EC 16 9C 
0A 70 9A 80 43 27 04 63 15 44 52 0C 00 67 20 8C 41

The image data is zlib-compressed using the deflate algorithm. zlib is specified in RFC1950, deflate is specified in RFC1951. The process is sufficient complex to not do it manually. We can use the javascript pako.js library to decompress the data block. This library was designed by Vitaly Puzrin and Andrey Tupitsin.

Here comes the code :

<!DOCTYPE HTML>
<html>
<head>
 <meta charset="utf-8">
 <title>Inflate byte block of PNG image pixel data with pako.js</title>
 <script type="text/javascript" src="js/pako.js"></script>
</head>
<body>
<h1>Inflate byte block of PNG image pixel data with pako.js</h1>
<div id="main"></div>
 <script type="text/javascript" >
// enter datastream as array
var hexData = [0x18, 0x95, 0x63, 0x38, 0x70, 0xE0, 0xC0, 0x7F, 0x06, 0x06, 
0x06, 0xAC, 0x18, 0x2A, 0x07, 0x61, 0x60, 0xC3, 0x50, 0x85, 0x70, 0x95, 0x28, 
0x12, 0x18, 0x0A, 0x08, 0x9A, 0x80, 0xEC, 0x16, 0x9C, 0x0A, 0x70, 0x9A, 0x80, 
0x43, 0x27, 0x04, 0x63, 0x15, 0x44, 0x52, 0x0C, 0x00, 0x67, 0x20, 0x8C, 0x41];
 // Pako inflate
 var inflateData = pako.inflate(hexData);
// output inflated data
var output = "<p>The lenght of the inflated data sequence is : " 
+ inflateData.length + "bytes.<br/>"; 
 for (i = 0 ; i < 8; i++) {
 for (j = 0 ; j < 33; j++) {
 console.log((i * 33) + j);
 output+= decimalToHexString(inflateData[(i * 33) + j]) + " ";
 } // end for loop j
 output+= "<br/>";
 } // end for loop i
 output+= "</p>";
 element = document.getElementById("main");
 element.innerHTML = output;
 function decimalToHexString(number)
{ if (number < 0)
 { number = 0xFFFFFFFF + number + 1; }
 return number.toString(16).toUpperCase();
}
</script>
</body>
</html>
Byte sequence in PNG image rows

Byte sequence in PNG image rows

The byte sequence of pixel data stored in  PNG images is shown in the left figure.

In our case we have 8 rows with 8 * 4 bytes (RGBA) plus one null byte, giving a total of 8 * 33 = 264 bytes.

Click the inflate link to see the result of the inflate process. The sequence length is really 264 bytes and the structure of the PNG format is visible in the output.

inflating

inflating PNG image data

The RGB hexadecimal values C0 generate grey (white) pixels, the values 0 generate black pixels. The alpha channel is always transparent (hex FF).

Synthesize a PNG image

To synthesize a minimal PNG image with monochrome PixelData, we modify the original canvas.png data as follows :

1. The signature does not change, the bytes in hexadecimal format are :

89 50 4E 47 0D 0A 1A 0A

2. In the header we set the bit depth to 1 (mono-chrome) and the color type to 0 (gray-scale). We get the following byte sequence in hexadecimal format :

00 00 00 0D 49 48 44 52 00 00 00 08 00 00 00 08 01 00 00 00 00

We have several possibilities to calculate the new CRC32 checksum over the header name and the new data :
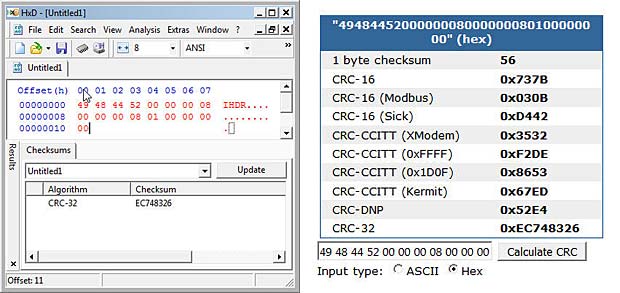
CRC32 calculation with desktop and online tool

CRC32 calculation with desktop and online tool

Here comes the code for the javascript CRC32 calculation :

<!DOCTYPE HTML>
<html>
<head>
 <meta charset="utf-8">
 <title>Calculate checksum crc32 with SheetJS/js-crc32 
of canvas.png chunks</title>
 <script type="text/javascript" src="js/SheetJS_crc32.js"></script>
</head>
<body>
<h1>Calculate checksum crc32 with SheetJS/js-crc32 of canvas.png chunks</h1>
<div id="main"></div>
 <script type="text/javascript" >
 // calculate crc32 over chunk name and data
// enter datastream as hexadecimal numbers
var charData = [0x49, 0x48, 0x44, 0x52, 0x00, 0x00, 0x00, 0x08, 0x00, 0x00, 
0x00, 0x08, 0x01, 0x00, 0x00, 0x00, 0x00];
var myCRC32 = CRC32.buf(charData);
var crc = decimalToHexString(myCRC32);
var output = "<p>Here is the signed 32 bit number of the CRC32 : " 
+ myCRC32 + "<br/>Here is the hexadecimal value of the CRC32 : " 
+ crc + "</p>";
 element = document.getElementById("main");
 element.innerHTML = output;
 function decimalToHexString(number)
{  if (number < 0)
   { number = 0xFFFFFFFF + number + 1 }  
   return number.toString(16).toUpperCase();
} // end function
 </script>
</body>
</html>

Click this CRC32 link to see it working. The checksum to add to the IHDR chunk is EC 74 83 26.

Now we tackle the IDAT chunk. We have 8 rows for the PixelData, starting each with a NullByte (filter), followed by 1 byte in each row for the monochrome pixels. That makes a total of 16 bytes. The data length in hexadecial format is 10. We use 1 for black and 0 for white, giving us the following byte sequence :

00 7E 00 81 00 A5 00 81 00 99 00 81 00 E7 00 3C

This byte sequence is deflated with the Pako.js library with the following script :

<!DOCTYPE HTML>
<html>
<head>
 <meta charset="utf-8">
 <title>Deflate byte block of PNG image pixel data with pako.js</title>
 <script type="text/javascript" src="js/pako.js"></script>
</head>
<body>
<h1>Deflate byte block of PNG image pixel data with pako.js</h1>
<div id="main"></div>
 <script type="text/javascript" >
 // enter datastream as numbers
var charData = [0x00, 0x7E, 0x00, 0x81, 0x00, 0xA5, 0x00, 0x81, 0x00, 0x99, 
0x00, 0x81, 0x00, 0xE7, 0x00, 0x3C];
 // Pako deflate
 var deflateData = pako.deflate(charData);
 var output = "<p>The length of the deflated data sequence is : " 
+ deflateData.length + " bytes.<br/>";
 for (i = 0; i < deflateData.length; i++) {
 output+= decimalToHexString(deflateData[i]) + " ";
 } // end for loop i
 output+= "</p>";
 element = document.getElementById("main");
 element.innerHTML = output;
 function decimalToHexString(number)
{ if (number < 0)
 { number = 0xFFFFFFFF + number + 1; }
 return number.toString(16).toUpperCase();
}
</script>
</body>
</html>

Click this deflate link to see the result. The length of the deflated sequence has 21 bytes (hex : 15) and is longer than the original sequence.That happens with very short image sequences.

deflating

deflating PNG image data

There are possibilities to minify the deflated sequence lenght, but this is not our goal. There are several blogs and posts dealing with smallest possible png images.

The last step is the calculation of the CRC32 checksum, same procedure as above. The following crc32 link shows the 4 byte hexadecimal number : EC 01 89 73.

The final byte sequence for the IDAT chunk is displayed hereafter :

00 00 00 15 49 44 41 54 78 9C 63 A8 63 68 64 58 0A C4 33 81 F8 39 83 0D 00 23 
44 04 63 EC 01 89 73 

3. The IEND chunk remains unchanged and has no associated data :

00 00 00 00 49 45 4E 44 AE 42 60 82

To create and display this synthetic PNG image, we copy all the hexadecimal data in our HexEditor and save it as mysynth.png file. To check that the format is right, we can use the pngcheck tool or  load the image in Photoshop. It works.

png_check

Analayse file mysynth.png with pngcheck.exe

PNG in

Open file mysynth.png in Photoshop

Display the PNG image in the Browser

The typical HTML code to display an image in a web browser is

<img src="url" alt="abcde" width="xxx" height="yyy" />

The src attribute specifies the URI (uniform resource identifier) of the image. The most common form of an URI is an URL (uniform resource locator) that is frequently referred as a web address. URIs identify and URLs locate. Every URL is also an URI, but there are URIs which are not URLs.

The URI syntax consists of a URI scheme name (such as “http”, “ftp”, “mailto” or “file”) followed by a colon character, and then by a scheme-specific part. An example of an URI which is not an URL is a dataURI, for example

data:,Hello%20World

The data URI scheme is a URI scheme that provides a way to include data in-line in web pages as if they were external resources. This technique allows normally separate elements such as images and style sheets to be fetched in a single HTTP request rather than multiple HTTP requests, which can be more efficient.

We will use the dataURI to display our synthesized PNG image in a web browser without saving it to an external source. The data URI scheme is defined in RFC 2397 of IETF. URI’s are character strings, therefore we must convert (encode) the image data to ASCII text. The most common conversion is base64, another method is percent encoding.

There are several possibilities to encode our image data in base64 :

Here comes the code for the javascript btoa() conversion :

<!DOCTYPE HTML>
<html>
<head>
 <meta charset="utf-8">
 <title>Display mysynth.png with dataURI</title>
 </head>
<body>
<h1>Display mysynth.png with dataURI</h1>
<div id="main"></div>
 <script type="text/javascript" >
var signature = [0x89, 0x50, 0x4E, 0x47, 0x0D, 0x0A, 0x1A, 0x0A]; 
var ihdr = [0x00, 0x00, 0x00, 0x0D, 0x49, 0x48, 0x44, 0x52, 0x00, 0x00, 
0x00, 0x08, 0x00, 0x00, 0x00, 0x08, 0x01, 0x00, 0x00, 0x00, 0x00, 0xEC, 
0x74, 0x83, 0x26];
var idat = [0x00, 0x00, 0x00, 0x15, 0x49, 0x44, 0x41, 0x54, 0x78, 0x9C, 
0x63, 0xA8, 0x63, 0x68, 0x64, 0x58, 0x0A, 0xC4, 0x33, 0x81, 0xF8, 0x39, 
0x83, 0x0D, 0x00, 
0x23, 0x44, 0x04, 0x63, 0xEC, 0x01, 0x89, 0x73];
var iend = [0x00, 0x00, 0x00, 0x00, 0x49, 0x45, 0x4E, 0x44, 0xAE, 0x42, 
0x60, 0x82];
var mysynthPNG = signature.concat(ihdr).concat(idat).concat(iend);
var imageStringBase64 = btoa(String.fromCharCode.apply(null, mysynthPNG));
var mysynthImg=document.createElement("img");
mysynthImg.setAttribute('src', 'data:image/png;base64,' + imageStringBase64);
mysynthImg.setAttribute('alt', 'mysynthPNG');
mysynthImg.setAttribute('height', '8px');
mysynthImg.setAttribute('width', '8px');
document.body.appendChild(mysynthImg);
</script>
</body>
</html>

Click the following base64 link to see the result. The pixel colors are inverted, 1 is white and 0 is black.

Links

The following list provides links to websites with additional informations about image pixel manipulations :
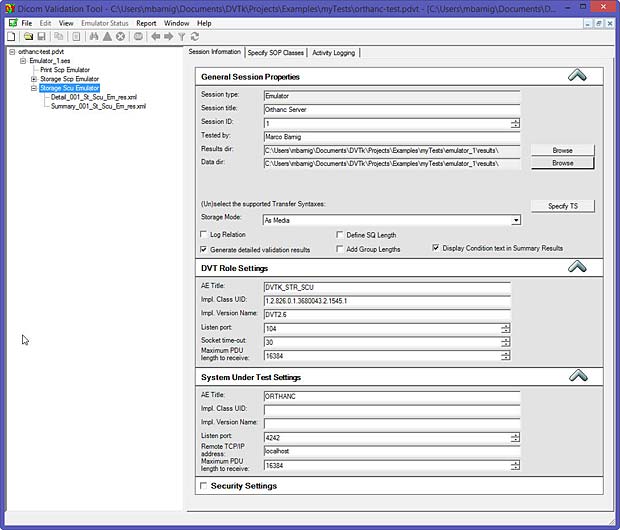
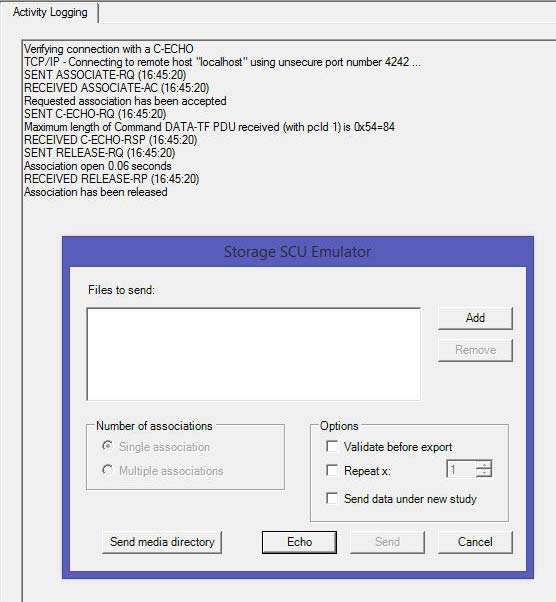
Photoshop plugins : JPEG-LS, JPEG-XR, JPEG-2000
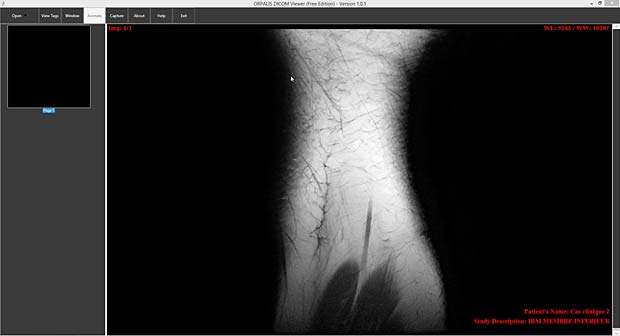
Last update: July 19, 2015

JPEG

JPEG (file extension.jpg) is a commonly used method of lossy compression for digital images. The degree of compression can be adjusted, allowing a selectable tradeoff between storage size and image quality. JPEG typically achieves 10:1 compression with little perceptible loss in image quality.

The term JPEG is an acronym for the Joint Photographic Experts Group, which was organized in 1986 and created the first standard in 1992. JPEG uses a lossy form of compression based on the discrete cosine transform (DCT). The method lossy means that some original image information is lost and cannot be restored, possibly affecting image quality.

Progressive JPEG

The interlaced Progressive JPEG format compresses data in multiple passes of progressively higher detail. This is ideal for large images that will be displayed while downloading over a slow connection, allowing a reasonable preview after receiving only a portion of the data.

Standard

Standard Photoshop CS2 JPEG Save as options

JPEG-HDR

JPEG-HDR is an extension to the standard JPEG image file format allowing it to store high dynamic range images. It was created by Greg Ward and Maryann Simmons as a way to store high dynamic range images inside a standard JPEG file.

JPEG-XR

JPEG XR is a still-image compression standard and file format for continuous tone photographic images, based on technology originally developed and patented by Microsoft under the name HD Photo. It supports both lossy and lossless compression and is supported in Internet Explorer 9 and alter versions. Today there are not yet cameras that shoot photos in the JPEG XR (.JXR) format.

Lossless JPEG

An optional lossless mode was defined in the JPEG standard in 1993, using a completely different technique as the lossy JPEG standard. The lossless coding process employs a simple predictive coding model called differential pulse code modulation (DPCM). Lossless JPEG has some popularity in medical imaging (DICOM), and is used in DNG and some digital cameras to compress raw images, but otherwise was never widely adopted.

Today the term lossless JPEG is usually used as umbrella term to refer to all lossless image compression schemes including JPEG-LS and JPG 2000.

JPEG-LS

JPEG-LS is a lossless/near-lossless compression standard for continuous-tone images with the official designation ISO-14495-1/ITU-T.87. Part 1 of this standard was finalized in 1999. Besides lossless compression, JPEG-LS also provides a lossy mode (“near-lossless”) where the maximum absolute error can be controlled by the encoder. The filename extension is .jls. Compression for JPEG-LS is generally much faster than JPEG 2000 and much better than the original lossless JPEG standard. The JPEG-LS standard is based on the LOCO-I algorithm (LOw COmplexity LOssless COmpression for Images) developed at Hewlett-Packard Laboratories.

JPEG 2000

JPEG 2000 is an image compression standard and coding system defined in 2000 with the intention of superseding the original discrete cosine transform-based JPEG standard with a newly designed, wavelet-based method. The standardized filename extension is .jp2 or .jpx for the extended part-2 specification. JPEG 2000 is not widely supported in web browsers and therefore not generally used on the Internet. JP2 includes mandatory metadata such as information about an image’s color space. It handles alpha transparency and 16-bit color mode.

Photoshop plugins : JPEG-LS, JPEG-XR, JPEG-2000
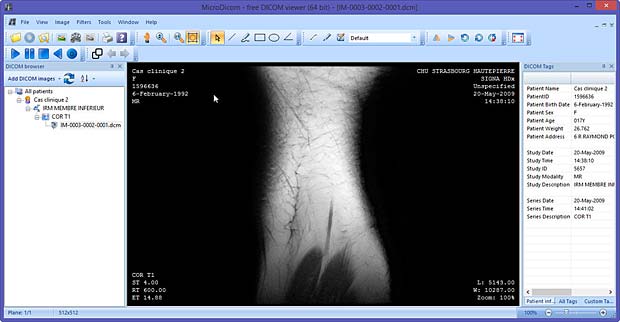
JPEG

Photoshop CS2 JPEG-LS plugin by HP

HP offers a copyrighted Photoshop plugin for JPEG-LS. Additional informations about JPEG-LS source code are available at the Wayback Archive Webpage of Aleks Jakulin.

A free JPEG 2000 (j2k) plugin for Photoshop is provided by fnord software, a small software boutique in San Francisco, creating graphics software primarily for Macintosh computers. fnord software provides also a SuperPNG plugin for Adobe Photoshop and a WebM plugin for Adobe Premiere.

JPEG 2000 plugin

JPEG 2000 plugin from fnor software in Photoshop CS2

The advanced features are not working as expected in my Photoshop CS2 version.

Microsoft provides a Photoshop plugin for JPEG-XR

plugin

JPEG-XR plugin from Microsoft in Photoshop CS2

.

DICOM standard

Last update : May 31, 2016
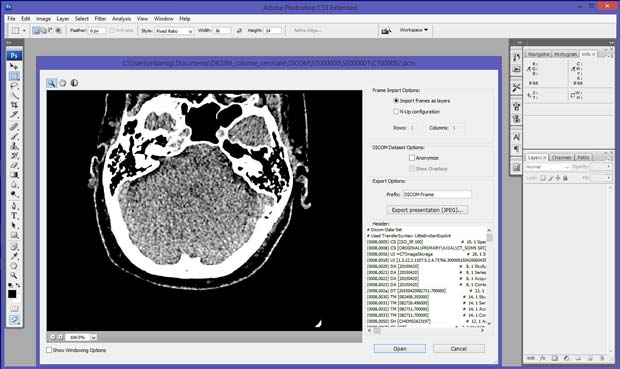
DICOM (Digital Imaging and Communications in Medicine) is a software integration standard that is used in Medical Imaging. It’s success relies on the ability of modern imaging equipment, manufactured by many different vendors, to seamlessly collaborate and integrate together. Medical imaging equipments are called Imaging Modalities and include X-Rays, Ultrasound (US), Computed Radiography (CR), Computed Tomography (CT), Magnetic Resonance Imaging (MRI), Endoscopie (ES),  and others.

DICOM standard

The Digital Imaging and Communications in Medicine (DICOM) standard (now ISO 12052) was first conceived by the American College of Radiology (ACR) and the National Electrical Manufacturers Association (NEMA) in 1983. DICOM changed the face of clinical medicin. The release 3 of the standard was published in 1993 and since then an updated version is edited every year.  The current version is PS3-2016b. The DICOM standard is often considered to be be very complicated or tricky, the publication is now more than 3.000 pages long. A list of the 18 parts (parts 9 and 13 were retired) of the DICOM standard is shown below :
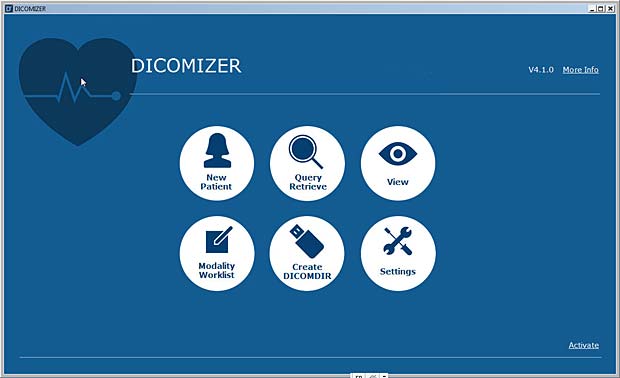
  • Part 3.1 : Introduction and Overview
  • Part 3.2: Conformance
  • Part 3.3: Information Object Definitions
  • Part 3.4: Service Class Specifications
  • Part 3.5: Data Structures and Encoding
  • Part 3.6: Data Dictionary
  • Part 3.7: Message Exchange
  • Part 3.8: Network Communication Support for Message Exchange
  • Part 3.10: Media Storage and File Format for Media Interchange
  • Part 3.11: Media Storage Application Profiles
  • Part 3.12: Media Formats and Physical Media for Media Interchange
  • Part 3.14: Grayscale Standard Display Function
  • Part 3.15: Security and System Management Profiles
  • Part 3.16: Content Mapping Resource
  • Part 3.17: Explanatory Information
  • Part 3.18: Web Access to DICOM Persistent Objects (WADO)
  • Part 3.19: Application Hosting
  • Part 3.20 : Transformation of DICOM to and from HL7 Standards

The DICOM standard is promoted by IHE (Integrating the Healthcare Enterprise), an initiative by healthcare professionals and industry to improve the way computer systems in healthcare share information.

DICOM core

The DICOM core is a file format and a networking protocol.

All medical images are saved in DICOM format, but DICOM files contain more than just images. Every DICOM file holds informations about the patient, the context of the study, the type of equipment used etc.

All medical imaging equipments that are connected to a health network (hospital, …) use the DICOM network protocol to exchange informations, mainly images and binary data. This protocol allows to search for medical images in an archive and to download them to a doctor’s workstation in order to display them.

DICOM Objects

Developers knowing object oriented programming should be familiar with DICOM objects. Patients, medical devices, clinical studies etc are entities in the real world. DICOM has abstract definitions for these entities, called DICOM Information Entities (IEs). DICOM uses a data model with SOP (Service Object Pair) classes and  Information Object Definitions (IODs)  to handle these entities in the DICOM world. For example, a patient IOD has attributes for patient’s name, ID, date of birth, weight, sex and all other clinically relevant patient related informations.

The DICOM data model defines four object levels :

  1. Patient
  2. Study
  3. Series & Equipment
  4. Instance (image)

The name instance, instead of image, was introduced some years ago, because there are now DICOM objects at the fourth level which are not images. These objects are sometimes called DICOM P10 instances with reference to the PS3.10 DICOM standard.

Each of the levels can contain several sub-levels. The following figure shows the DICOM information hierarchy :

dicom_b

DICOM Information Hierarchy

One patient may have multiple studies at different times, each study may include several series with one or more instances.

DICOM differentiates between normalized and composite IODs. A normalized IOD represent a single real-world entity with inherent attributes. Composite IODs are mixtures of several real-world entities.

The DICOM Information Modules are used to group attributes into logical and structured units. Modules can be mandatory, conditional, optional or user-defined. DICOM specifies for each IE the modules it should include. For example, the patient IE should include the patient module, the specimen identification module and the clinical trial subject module. All DICOM objects must include the SOP common module and the four modules of the data model. All DICOM instances that are images must include the Image module.

The attributes of an IOD are encoded as Data Elements.

Let’s summarize the chapter about DICOM objects in a few other words :

  • The DICOM data model is made of Information Entities (IEs)
  • The classes of the DICOM data model are called SOP classes
  • SOP is a pair of a DICOM object and a DICOM service
  • SOP classes are defined by IODs
  • IODs are collections of modules
  • Modules are collections of data elements
  • Data elements collections refer to an Information Entity (IE)

DICOM Data Elements

DICOM objects are encoded in binary form as sequential lists of attributes, called Data Elements.  Every data element has :

  • a tag to uniquely define the element and its proprieties. A tag is comprised of a 16-bit Group number and a 16-bit Element number. Data elements that are related to another have the same Group number.
  • an optional Value Representation (VR), represented as two character code, to define the data type (examples : UI = Unique identifier, CS = coded string, US = unsigned short, …). The VR is called explicit when available. The data type is also specified by the tag and VR is omitted (implicit VR) if determined by the negotiated Transfer Syntax.
  • a length to specify the size of the value field. DICOM values length are always even. Values with a single data are padded by a space in the case of strings and by a null (0x0) in the case of binary types. DICOM lengths are specified with 16 bit if VR is explicit and with 32 bit if VR is implicit. The value filed length can be undefined (FFFFFFFFH).
  • a value field with the corresponding informations. If the length of the value field is undefined, a sequence delimitation item marks its end.
DICOM File displayed in Hexeditor

DICOM File displayed in Hexeditor

There are thousands of different DICOM data elements with a well specified meaning. The names of the data elements are referenced in a DICOM dictionary. Here are some examples :

Tag Group Number Tag Element Number Element or Attribute Name
0010 0010 Patient’s Name
0010 0030 Patient’s Birthday
0020 0011 Series Number
0028 0010 Image Rows
0028 0011 Image Columns

The data elements are sorted sequentially by ascending tag number. It’s possible to define additional elements, called private elements, to add specific informations, but it is recommended to use existing elements whenever possible. Standard DICOM data elements have an even group number and private data elements have an odd group number.

Secondary Capture Image Object

The simplest DICOM object is the Secondary Capture (SC) Image. It has a minimal set of data elements that a DICOM application needs in order to display and archive a medical image. It’s not related to a particular medical image device. The following table shows the mandatory modules for the Secondary Capture Image Object :

Information Entity (IE) Module Reference
Patient Patient C.7.1.1
Study General Study C.7.2.1
Series General Series C.7.3.1
Equipment SC Equipment C.8.6.1
Instance (Image) General Image C.7.6.1
Image Image Pixel C.7.6.3
Image SC Image C.8.6.2
Image SOP Common C.12.1

There are only two modules that are specific to SC (Secondary Capture), the other modules are common and shared by many IODs. Every module is rather large and includes lots of data elements, but luckily most of these data elements are optional. In the DICOM standard the modules are marked with a type column :

  • value 1 : data element is mandatory and must be set
  • value 2 : data element is mandatory, but can be null
  • value 3. data element is optional

Values 1 and 2 can also been marked as c for conditional.

The following table shows the mandatory data elements for the Secondary Capture Image Object :

Attribute Name Tag Type
Patient’s Name (0010, 0010) 2
Patient ID (0010, 0020) 2
Patient’s Birth Date (0010,0030) 2
Patient’s Sex (0010, 0040) 2
Study Instance UID (0020, 000D) 1
Study Date (0008, 0020) 2
Study Time (0008, 0030) 2
Referring Physician’s Name (0008, 0090) 2
Study ID (0020, 0010) 2
Accession Number (0008, 0050) 2
Modality (0008, 0060) 1
Series Instance UID (0020, 000E) 1
Series Number (0020, 0011) 2
Laterality (0020, 0060) 2C
Conversion Type (0008, 0064) 1
Instance Number (0020, 0013) 2
Patient Orientation (0020, 0020) 2C
Samples per Pixel (0028, 0002) 1
Photometric Interpretation (0028, 0004) 1
Rows (0028, 0010) 1
Columns (0028, 0011) 1
Bits Allocated (0028, 0100) 1
Bits Stored (0028, 0101) 1
High Bit (0028, 0102) 1
Pixel Representation 0028, 0103) 1
Pixel Data (7FE0, 0010) 1C
Planar Configuration (0028, 0006) 1C
SOP Class UID (0008, 0016) 1
SOP Instance UID (0008, 0018) 1
Specific Character Set (0008, 0005) 1C

Unique Identifiers

DICOM makes extensive use of Unique Identifiers (UIDs). Almost every entity has a UID, with the exception of the patient (patients are identified with their name and their ID). DICOM defines a mechanism in order to make sure UIDs are globally unique. Every DICOM application should acquire a root UID that is used as a prefix for the UIDs it creates.

Usually the Study Instance UID is provided through a DICOM service called Modality Worklist. The Series UID and the SOP Instance UID are always generated by the application.

DICOM Networking Protocol

The following figure shows the typical medical imaging workflow.

Workflow

Medical Imaging Workflow

The workflow begins when the patient gets registered in the Hospital Information System (HIS). An Electronic Medical Record (EMR) is generated for the new patient. A medical procedure, for example an X-Ray of the thorax, is ordered and placed into the Radiology Information System (RIS). The RIS generates a study scheduled and sends an HL7-event to a HL7-DICOM gateway. The gateway sends the study scheduled event to the Picture Archiving and Communication System (PACS) to prefetch previous exams of the patient. When the patient arrives at the modality (X-Ray in this example), the technologist requests the Modality Worklist (MWL : a sort of task manager) and updates the RIS. The acquired images are forwarded to the PACS where they are checked, stored and forwarded to the review workstation of the radiologist. The radiologist views the study images and reports possible pathologies.

The Modality Worklist is combined with a Modality Performed Procedure Step (MPPS) that allows the Modality to report the task status and to take ownership over the task. Associated to MPPS are the Requested Procedure (RP), the Requested Procedure Description, the Requested Procedure Code Sequence and the Scheduled Procedure Step (SPS). MPPS is the checkmark for MWL.

The main DICOM nodes in this workflow are the Modality, the PACS and the Workstation. DICOM’s network communication is based on the ISO/OSI model. The entities (nodes) in the network are specified with the following parameters :

  • Application Entity (AE) Title : max 16 characters, case sensitive;
    it’s a sort of alias for the combination of IP address and port number
  • IP address
  • Port number

With the parameters of the source and the target AE, we can start a per-to-peer session called Association. This is the first step of a DICOM network communication. The second step is exchanging DICOM commands. Most problems in DICOM communications are related to failing association negotiations. Errors are reported in the DICOM log.

The calling AE sends an Association Request to the target (called) AE. It’s a description of the application, its capabilities and its intentions in this session (presentation context). The called AE checks the request and sends back an Association Response, confirming what can and can’t be done. If its doesn’t match, the calling AE can reject the association. An important parameter is the Max PDU Size, an application level packet that says how big is the buffer consumed for the request. Some calling application entities uses buffer sizes too large for the called application entity; the result can be a crash due to a buffer overflow. In case of none-response by the called AE, the request will timeout.

A DICOM service related to the exchange step is Storage Commitment (SCM) that lets you verify if files sent to a PACS where indeed stored correctly. The result is sent using the N-EVENT-REPORT command.

DICOM services are used for communication within an entity and between entities. A service is built on top of a set of DICOM Message Service Elements (DIM-SEs) adapted to normalized and composite objects. DIM-SEs are paired : when a device issues a command, the receiver responds accordingly.

DICOM services are referred to as Service Classes. A Service Class Provider (SCP) provides a service, a Service Class User (SCU) uses a service. A device can be an SCP, an SCU or both. The following table shows the main DIM-SE’s : commands with a C-prefix are composite and those with a N-prefix are normalized.

C-ECHO sort of application level ping to verify a connection;
this service is mandatory for all AEs
C-FIND inquiries about information object instances
C-STORE allows one AE to send a DICOM object to another AE
C-GET transmission of an information object instance
C-MOVE similar to C-GET, but receiver is usually not the command initiator
C-CANCEL interrupt a command
N-CREATE creation of an information object
N-GET retrieval of information object attribute value
N-SET specification of an information object
N-DELETE Deletion of an information object
N-EVENT-REPORT result from SCM

A fundamental service implemented by every workstation is the Query / Retrieve (Q / R) task. The query is done with C-FIND. The keys to search are Patient Name, Patient ID, Accession Number, Study Description, Study Date, Modality, … The Retrieve is done with C-MOVE and C-STORE commands.

DICOM Serialization = Transfer Syntax

To transmit DICOM objects through a network or to save them into a file, they must be serialized. The DICOM Transfer Syntax defines how this is be done. There are 3 basic transfer syntaxes presented in the next table :

UID Transfer Syntax Notes
1.2.840.10008.1.2.1 Little Endian Explicit (LEE) stores data little-end first, explicit VR
1.2.840.10008.1.2.2 Big Endian Explicit (BEE) stores data big-end first, explicit VR
1.2.840.10008.1.2 Little Endian Implicit (LEI) stores data little-end first, implicit VR

A complete list is shown in my post DICOM TransferSyntaxUID.

The transfer syntax specifies 3 points :

  • if VRs are explicit
  • if the low byte of muti-byte data is the first serialized or the last serialized
  • if pixel data is compressed and when yes, what compression algorithm is used

LEI is the default Transfer Syntax which shall be supported by every conformant DICOM Implementation. Compressed pixel data transfer syntax are always explicit VR little Endian. The following compression methods can be used :

  • jpeg
  • jpeg lossless
  • jpeg 2000
  • RLE
  • JPIP
  • MPEG2
  • MPEG4

If DICOM objects are serialized into files, there are additional informations to provide :

  • a  preamble of 132 bytes, where the first 128 bytes are null and the last 4 bytes are the DICOM magic number DICM.
  • a file meta header consisting of data elements of group 0002, written in Little Endian Explicit
  • an element (0002, 0010) with the Transfer Syntax UID that is used for all the data elements other than group 0002.

Group 0002 data elements are strictly used for files and must be removed before sending DICOM objects over the network.

If DICOM files are saved on a standard CD / DVD, they should have a file named DICOMDIR in its root directory. DICOMDIR is a DICOM object listing the paths to the files stored on the media. The file names of these files should be capital alphanumeric up to 8 characters with no suffix. An example of naming conventions is shown hereafter :

  • directory PAxxx for every patient  (xxx = 001, 002, …)
  • inside PAxxx a directory STyyy for every (yyy = 001, 002, …)
  • inside STyyy a directory SEzzz for every series (zzz = 001, 002, …)
  • inside SEzzz a DICOM file MODwwwww for every instance
    (MOD = CT, CR, …; wwwww = 00001, 00002, …)

DICOM files stored in the cloud or on a non-DICOM media have the suffix .dcm.

Pixel Data

Because imaging is the heart of DICOM, we will deal with the bits of images in a specific chapter called pixel data. The data elements of the pixel module have group number 0028 and are responsible for describing how to read the image pixels. The next table shows the different data elements :

Tag VR Description
(0028, 0002) US Samples PerPixel : number of color channels; grey = 1
(0028, 0004) CS PhotometricInterpretation : MONOCHROME1 -> 0 = white ;
MONOCHROME2 -> 0 = black ; YBR_FULL -> YCbCr space
(0028, 0006) US PlanarConfiguration : 0 = interlaced color pixels ; 1 = separated pixels
(0028, 0008) IS NumberOfFrames : number of frames in the image; multi-frame >1
(0028, 0010) US Rows : height of the frame
(0028, 0011) US Columns : width of the frame
(0028, 0100) US BitsAllocated : space allocated in the buffer (usually 16)
(0028, 0101) US BitsStored : how many allocated space is used (in CT usually 12)
(0028, 0102) US HighBit : the bit number of the last bit used (in CT usually 11)
(0028, 0103) US PixelRepresentation : unsigned = 0 (default) ; signed = 1
(0028, 1050) DS WindowCenter :
(0028, 1051) DS WindowWidth :
(0028, 1052) DS RescaleIntercept :
(0028, 1053) DS RescaleSlope :
(7FE0, 0010) OB Image Pixel Data : (for CT -> VR = OW : other word)

The group number of the image data element is 7FE0 to be sure that this element is the last in the DICOM object. It is usually a very long data element and can be easily skipped if we want to read only the headers.

The Image Plane Module defines the direction of the image with reference to the patient body. It also gives the dimensions of the pixels in mm. The corresponding data element has tag 0020, 0037. DICOM defines a Reference Coordinate System (RCS) of the patient body.

X-direction is from Right to Left in the Axial (transversal) Cut. Y-direction is from Front (Anterior) to Back (Posterior) in the Sagittal Cut. Z-direction is from feet to head in Coronal Cut. The following letters are assigned to the ends of each direction :

  • [R] – Right – X decreases
  • [L] – Left – X increases
  • [A] – Anterior – Y decreases
  • [P] – Posterior – Y increases
  • [F] – Feet – Z decreases
  • [H] – Head – Z increases

These letters are usually displayed on the sides of a DICOM viewer. If the patient is in an oblique position, there can be letter combinations like [PR] for Posterior Right or [ALH] for Anterior Left Head.
onformance Statement

DICOM Conformance Statement

DICOM requires that a Conformance Statement must be written for each device or program claiming to be DICOM conformant. The format and content of a Conformance Statement is defined in the standard itself.

Links

Additional informations about the DICOM standard are available at the following websites :